
Microsoft is doubling down on the consolidation of tools and the focus on providing a platform for work, project and portfolio management. The new Microsoft Planner combines To Do, Microsoft Planner and Microsoft Project for the web into a single app for task and work management.
That in and of itself is extremely valuable when it comes to managing work. Then, when used in combination with Microsoft Teams for collaboration and the Power Platform for more advanced PPM scenarios and reporting, it’s a very powerful platform for work, project and portfolio management.
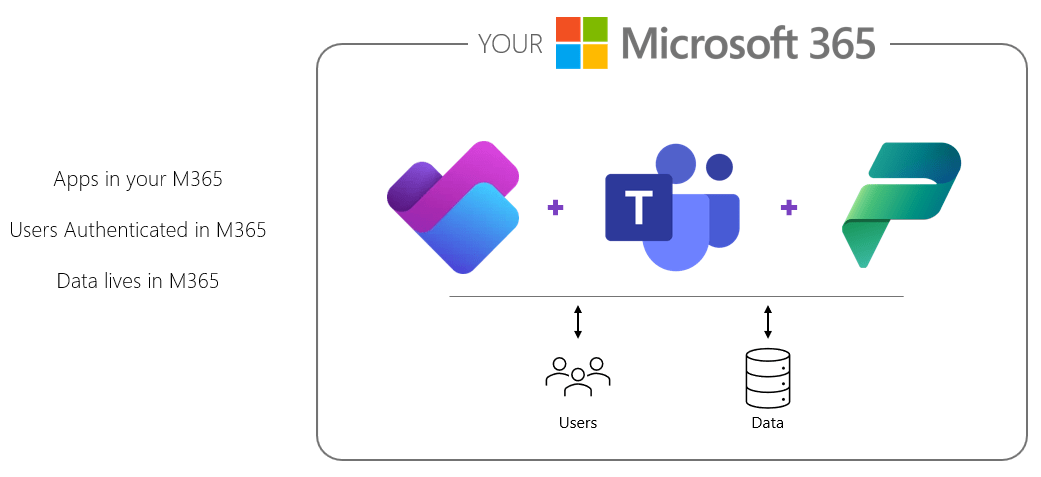
As a Microsoft client, you’re leveraging the investment you’ve already made and keeping your data and user authentication safe and secure inside your own Microsoft 365 tenant.
This blog post will walk you through the key aspects of using the new Planner and will act as an ongoing reference for you. The same information is covered and demonstrated in the embedded video.
The new Planner has launched as an app in Microsoft Teams and will also be available as a web experience later this year. The first thing you see in Planner is the “My Day” view. It shows you what you should be focused on right now across private tasks, flagged emails, and tasks from basic and premium plans. You can add and remove tasks manually from here. Tasks will also show up in this view automatically if their due date is “today”.
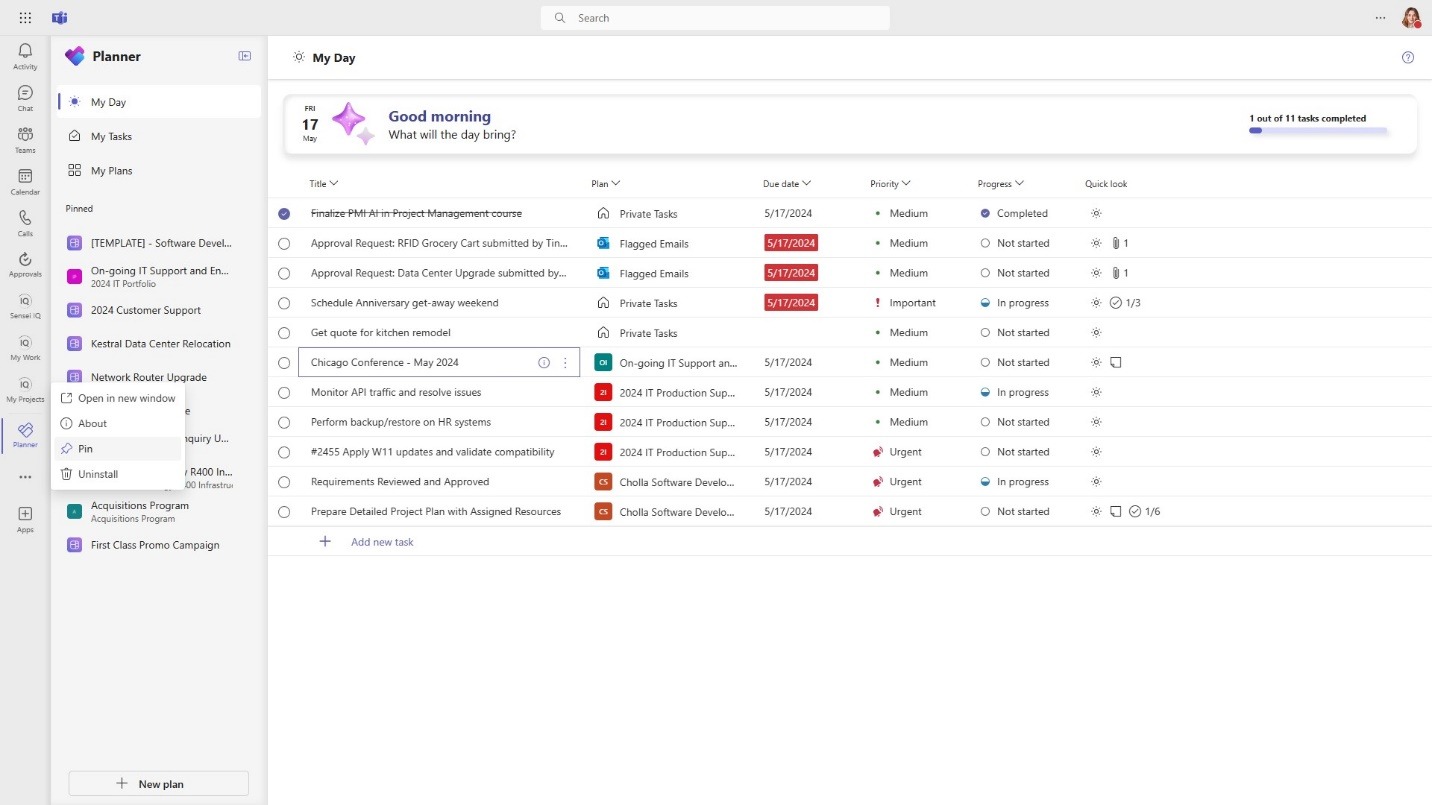
Figure 1 – “My Day” view in Microsoft Planner
You can status your tasks directly in the grid or you can open a task to see more details and status the work here. You can also create a new private task.
The ‘My Tasks’ view shows all work regardless of when it’s due. I tend to sort by ‘Due Date’ so I can see if anything’s falling behind.
Across the top, you can filter for ‘Private Tasks’, which are the ones you’ve created and no one else can see, or ‘Assigned to me’, which is work from basic and premium plans that’s been assigned to you. I will dive more into the difference between basic and premium plans later in this article. The last filter at the top is for ‘Flagged emails’, which is a really cool addition, if, like me, you use flags in your e-mails to tag items for follow-up. When I open a task here, the e-mail shows up in the attachment section.

Figure 2 – “My Tasks” view in Microsoft Planner
When you’re looking through your tasks, you can filter based on ‘Due Date’, ‘Priority’, and ‘Progress’. Microsoft has placed the search in the top left corner both in this view and inside of an individual plan. I can search for approvals, for example, and see all related tasks.
The next view is ‘My Plans’, where we can see all the plans we have access to. You’ll notice in the ‘privacy’ level that it shows who has access, whether it’s ‘Shared’ or ‘Only you’. If it’s shared, the last column shows which Microsoft 365 Group it’s shared with. There are filters across the top for ‘Recent’, ‘Shared’, ‘Personal’, ‘Pinned’ and ‘My Teams’.
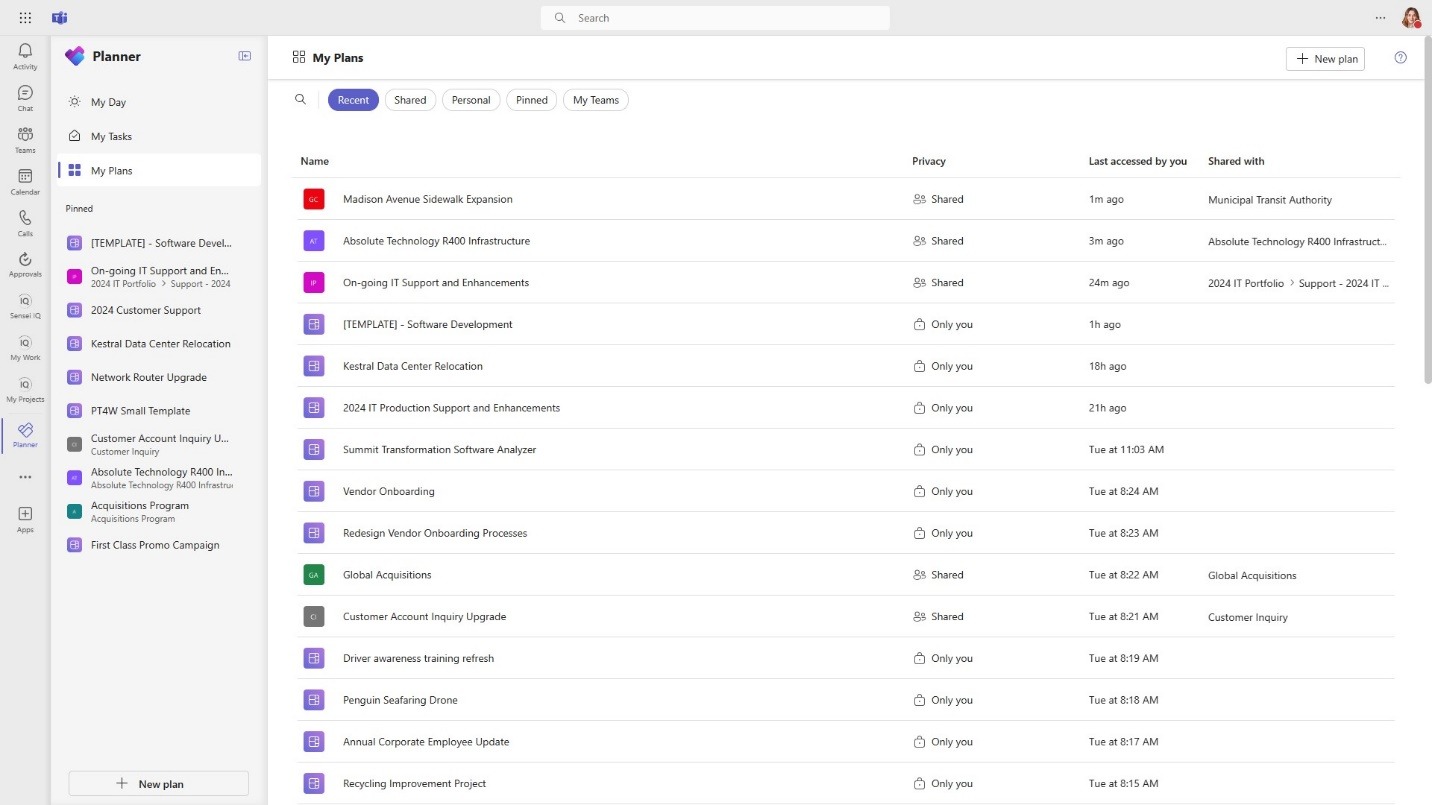
Figure 3 – “My Plans” view in Microsoft Planner
Related:
Free e-learning for Microsoft Project for the web
I’ve mentioned ‘basic’ and ‘premium’ plans a few times already, so let’s talk about the differences. In a nutshell, a ‘basic plan is what you’re used to from the old Planner in Microsoft 365. These plans are quite good for simple task management, for on-going work, or perhaps very small projects. You get a rich task experience where you can see who the task is assigned to, labels, buckets, progress, priority, start date, due date, options to repeat a task, notes, checklists, attachments; in addition, team members can add comments on a task. And all tasks from basic plans feed into the task views we looked at earlier.
If you need more than that, you can step up to a premium plan, which gets you more advanced options. With a premium plan, you get:
•Work Breakdown Structure: Organize work with summary and detailed tasks.
•Milestones: Track milestones.
•Task Effort: Completed, Remaining and Total.
•Duration and % Complete: More details around progress on tasks.
•Dependencies: FS, FF, SS and SF, as well as Delay type and Span.
•Custom Fields: Add more detail at a task level.
•Task History: View the changes made to a task.
•Conversations: Chat about a task in MS Teams.
•Assignments: Time-phased view of work.
•Baseline: Compare performance over time.
•Co-Pilot: Artificial Intelligence for your plan.
•Timeline (Gantt) view: Visualize the schedule.
•Sprint functionality: buckets for backlog & sprints.
•Team Workload: See where team members may be over- or under-allocated
•Roadmap: View key dates & activities across projects.
•Project Goals: Manage goals on a project.
•Custom Calendars: Create custom calendars for your project.
•Reporting: Automated, out-of-the-box Power BI dashboards.
•Power Platform: Reporting, advanced scenarios (extensions, governance workflow, automations)
You can think of a ‘premium’ plan as being Microsoft Project for the web on steroids!
And while the core functionality of Project for the web (or now premium plans) hasn’t changed too much, the integration into the Planner app comes with some very important additional benefits. Most importantly, it provides an improved team member experience where they can now see tasks across projects in those two views we looked at earlier. This was a big gap that’s now been filled. Another benefit, of course, is Copilot for Artificial Intelligence (AI) integration, which we’ll look at later in this article.
First, let’s take a look at a premium plan in the new Planner. As I mentioned earlier, Microsoft moved the search to the top left corner, so it’s now easy to find specific tasks in the plan. At the task level, premium plans offer a more detailed and rich experience with duration, % complete, sprint functionality, effort, custom fields, advanced dependencies with lead and lag time, as well as task conversations in Teams, and the ability to connect a task to project goals. You even get a complete task history so you can track detailed changes on the task.
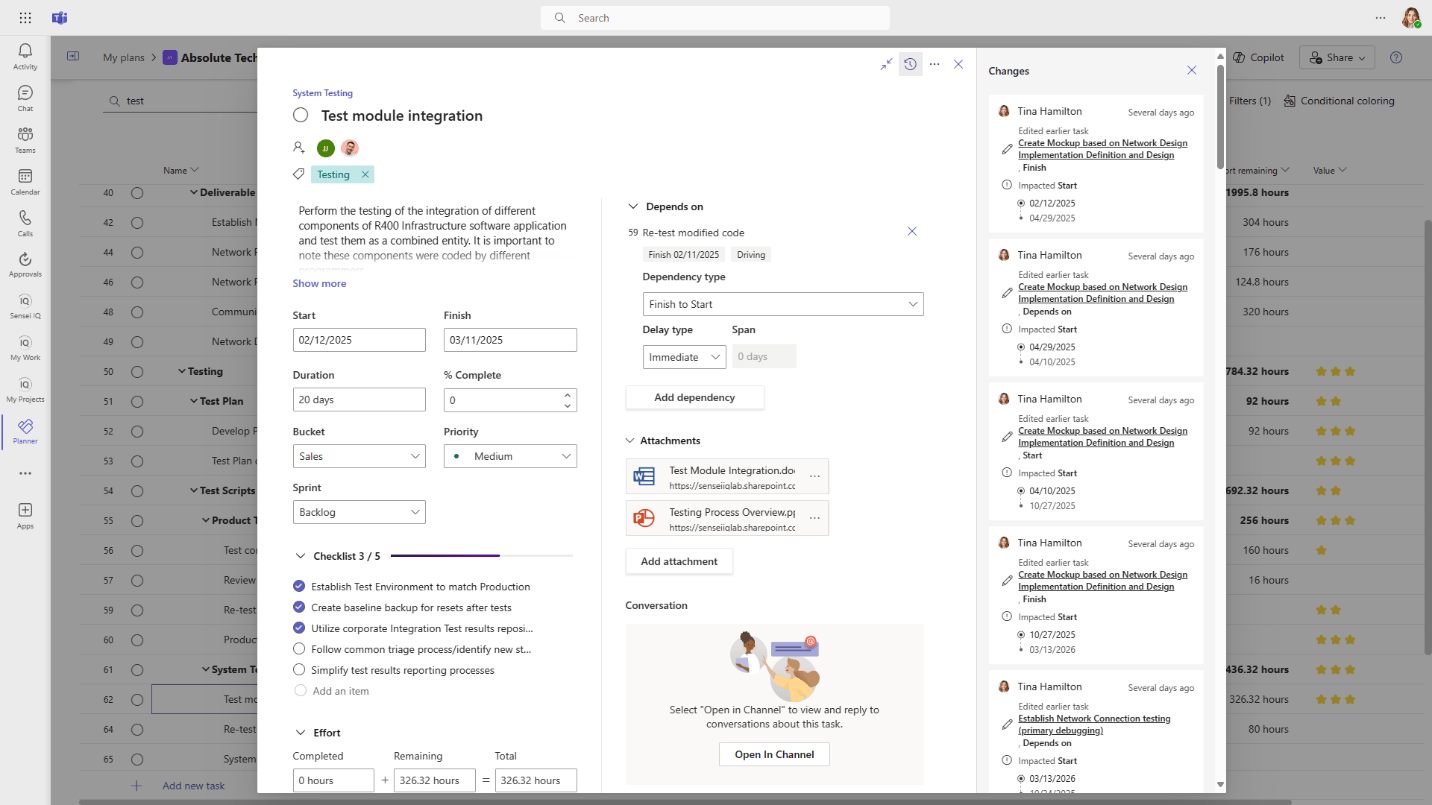
Figure 4 – Task history in Microsoft Planner
The upgraded board view helps you organize the work into customizable buckets.
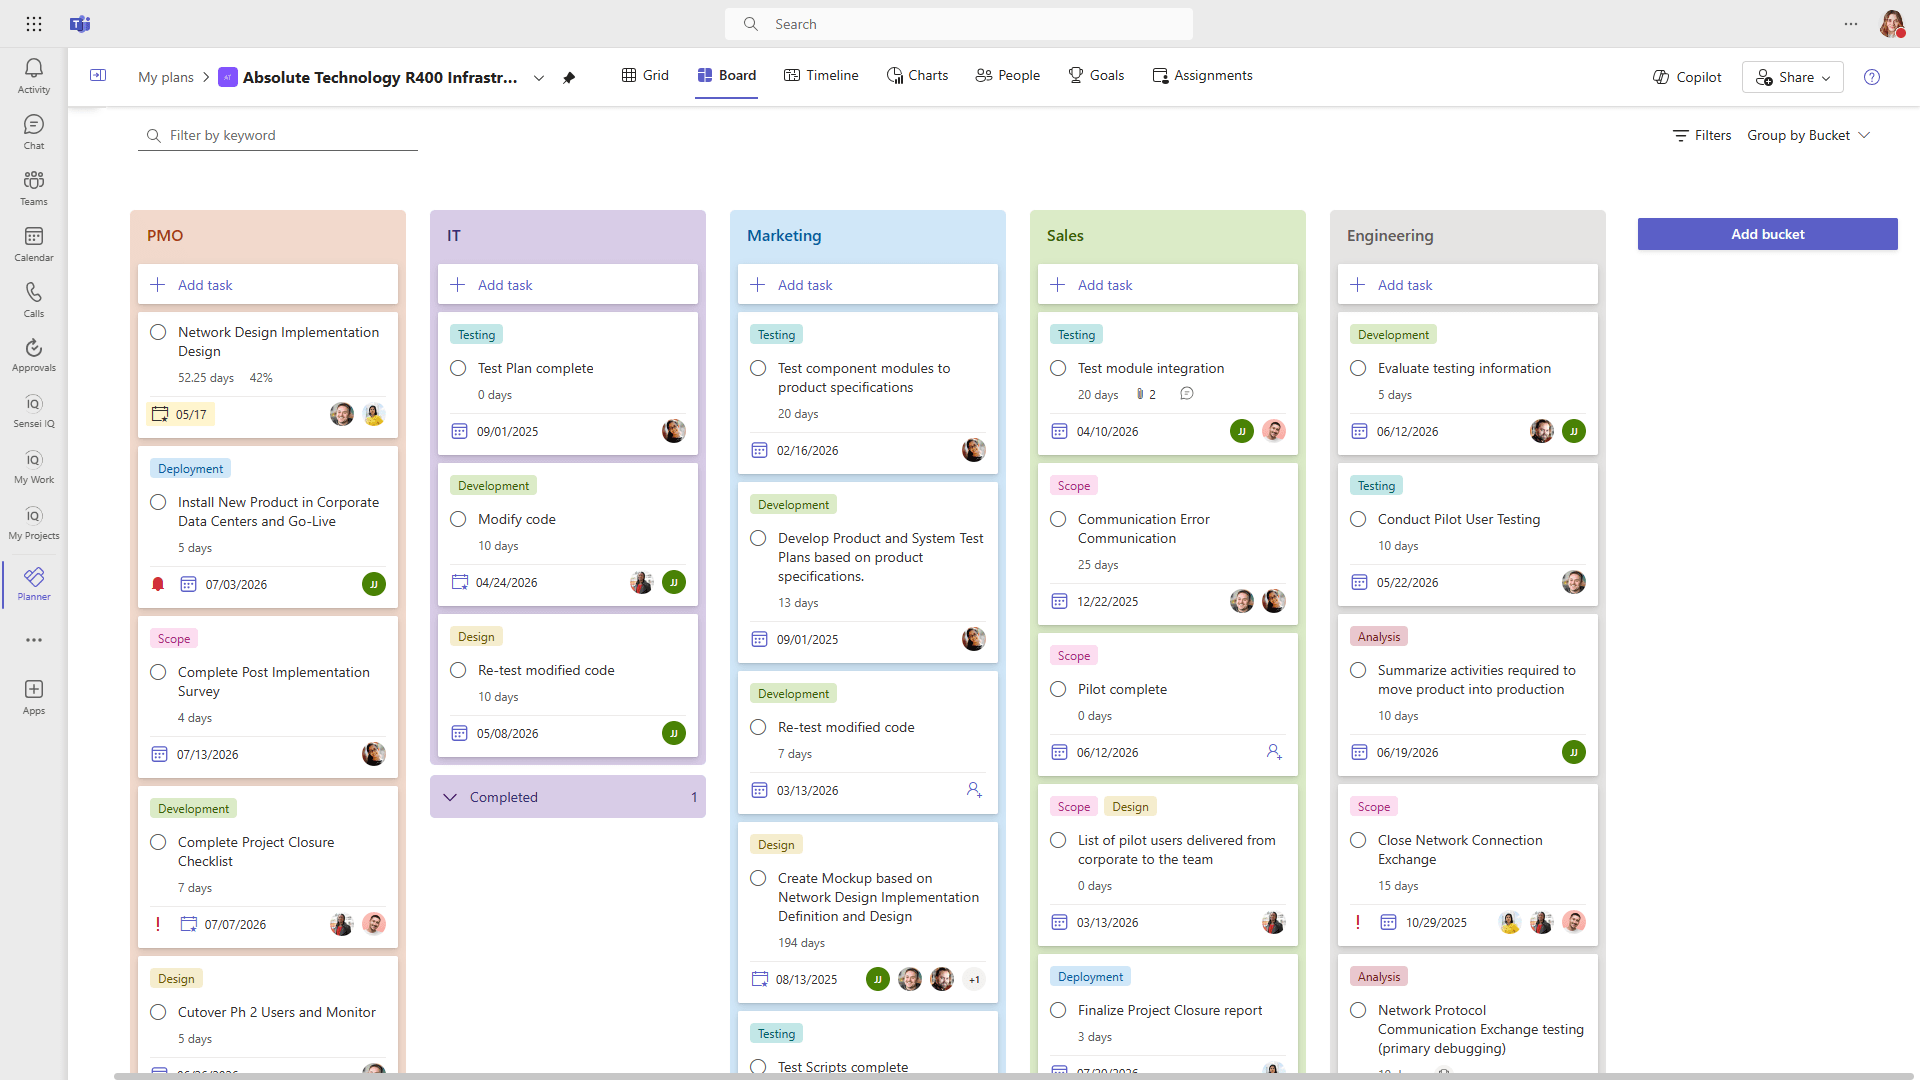
Figure 5 – “Board” view in Microsoft Planner
You can also choose to see the work by who it’s assigned to or by Progress, which shows tasks ‘Not Started’, ‘In progress’ and ‘Completed’. Grouping by Finish Date calls out any tasks that are ‘Late’, due ‘Today’, ‘Next week’ or at a future date beyond that. And you can group by labels, which shows the phases of the project. There’s a priority field for each task, so this board makes it easy to see what the most urgent and important work is.
If your development team wants to manage their work in sprints, they can easily filter the sprint board for their tasks, and it doesn’t change the end date or the dependencies of the tasks when you move items from the backlog into specific sprints.
With the interactive timeline view, you can visualize the work, then drag tasks to shift the dates, extend the duration of a task, create dependencies between tasks, and show the critical path of the project.
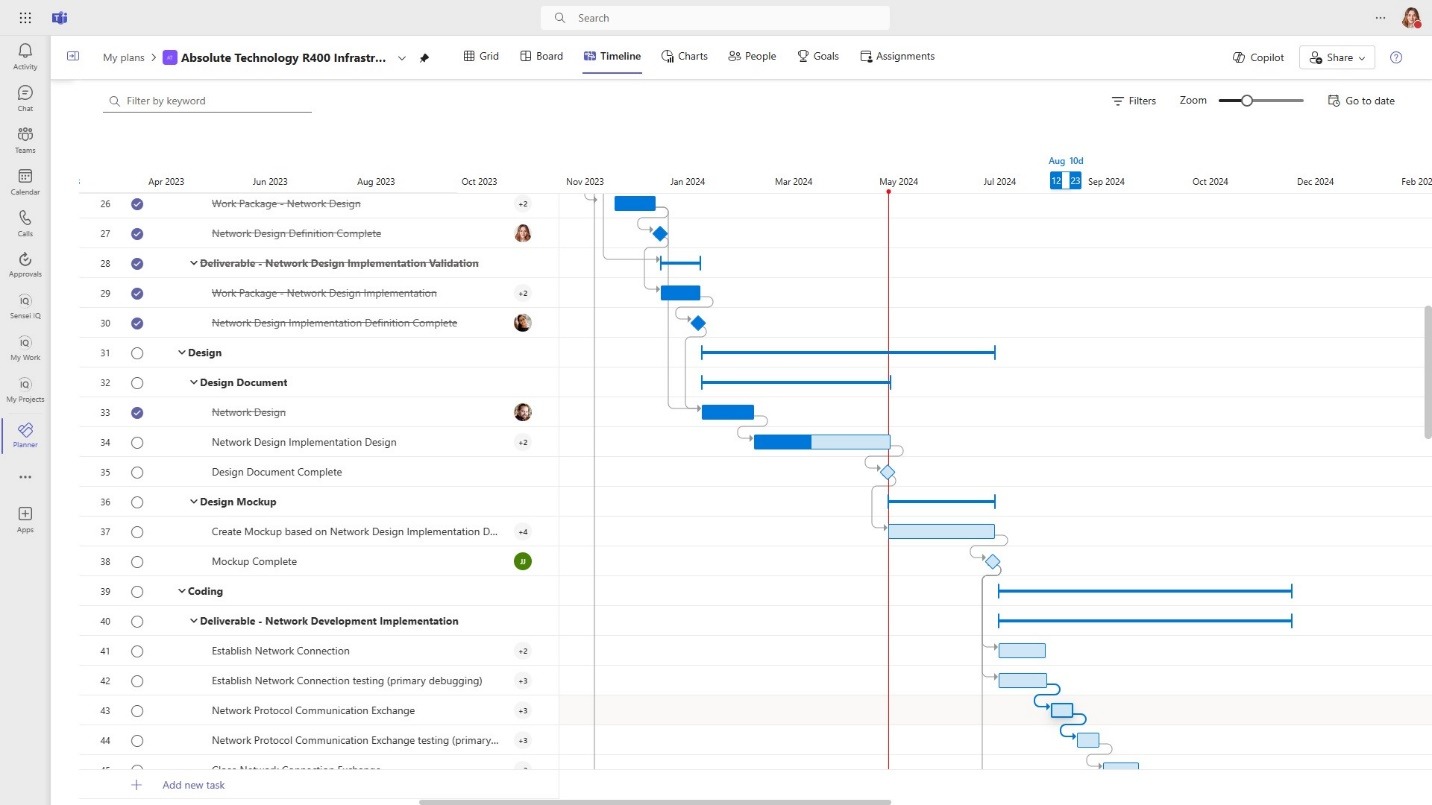
Figure 6 – “Timeline” view in Microsoft Planner
The ‘Charts’ view summarizes tasks by status, bucket, and effort per person.
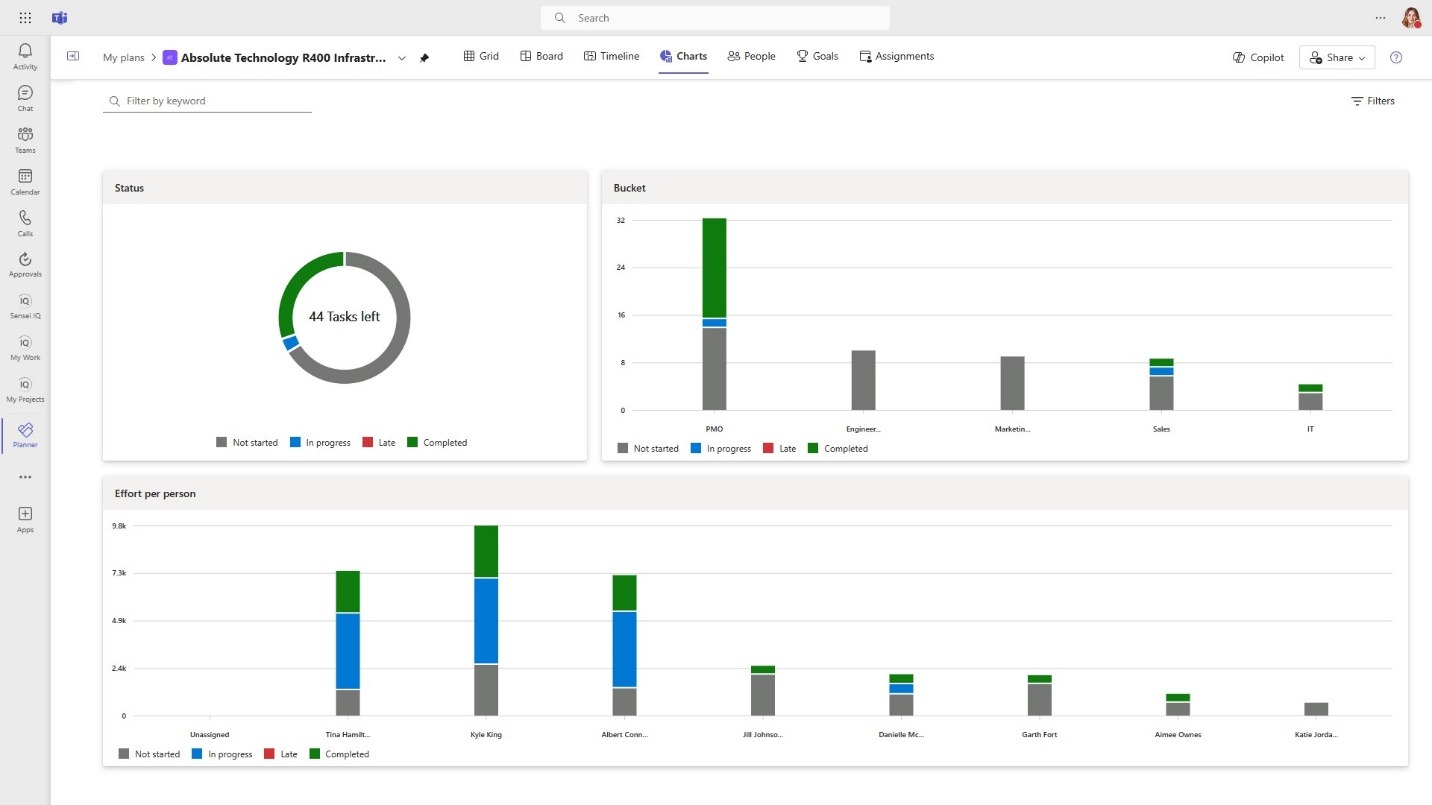
Figure 7 – “Charts” view in Microsoft Planner
The People view helps us better understand and balance workload, either by number of tasks or hours assigned. If you turn off compact mode, you’ll get the full richness of the tasks and stay in the context of those color-coded buckets.
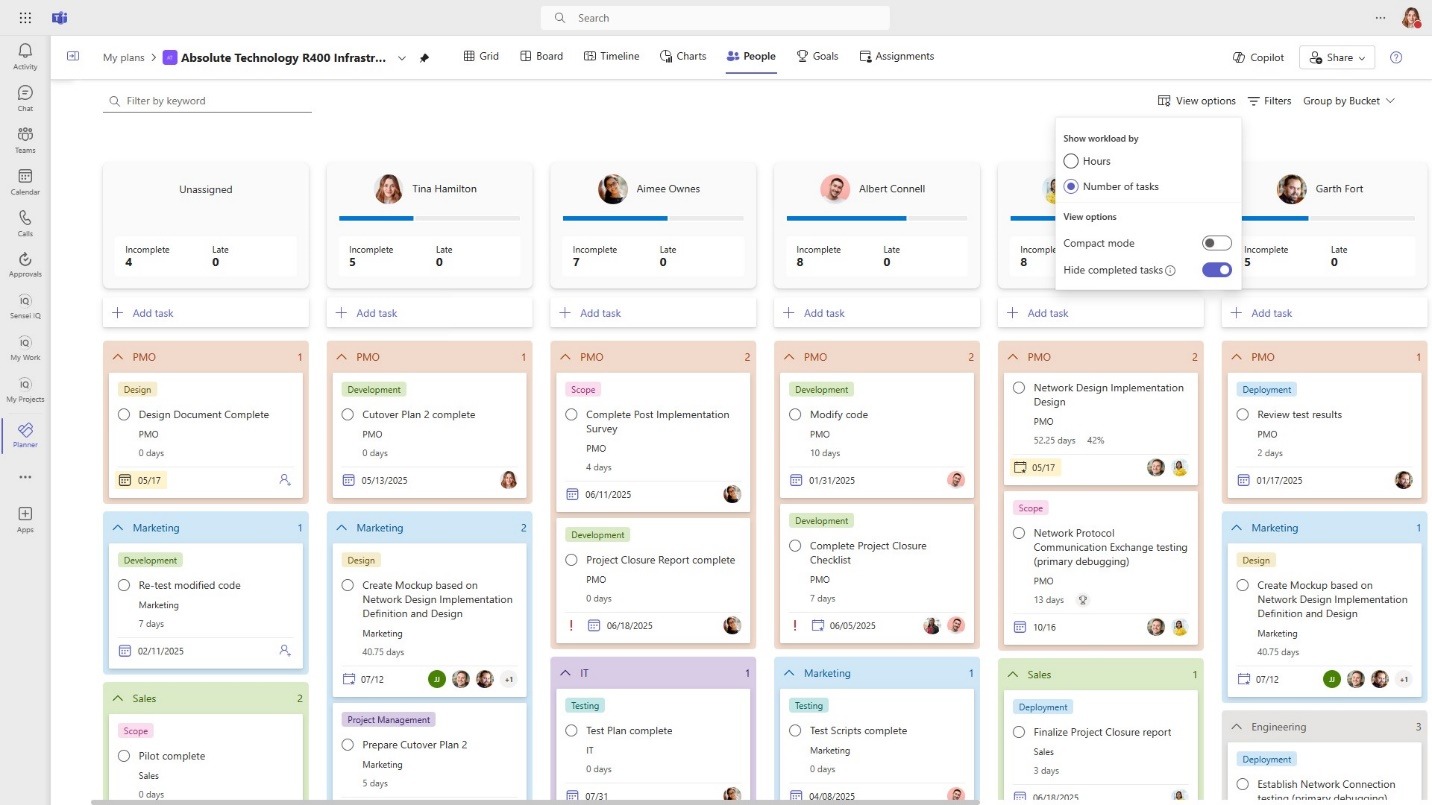
Figure 8 – “People” view in Microsoft Planner
With Goals, you can begin with the end in mind and connect the tasks that will get you there. See a detailed blog post with video on goals here: BLOG/VIDEO: Goals in Microsoft Project for the web
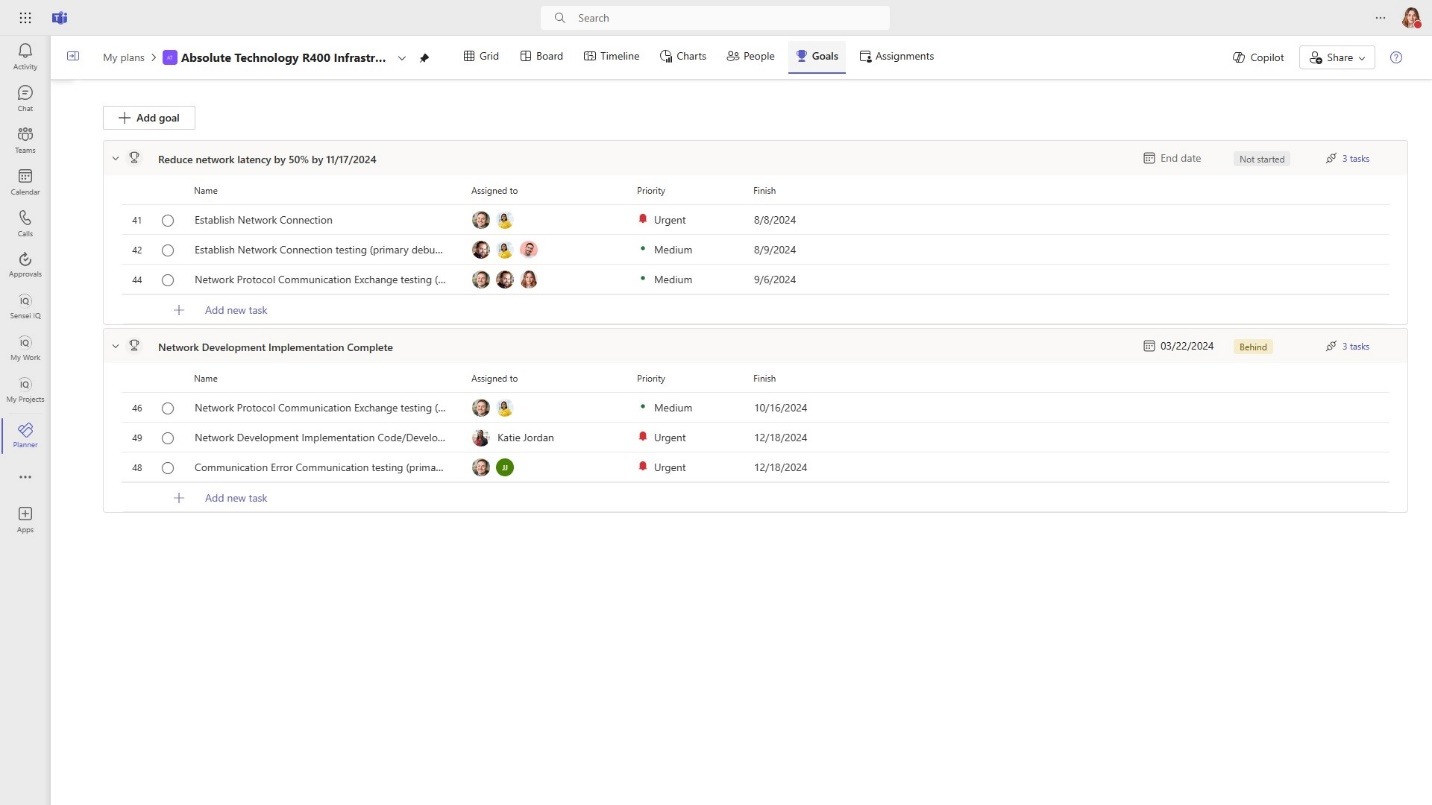
Figure 9 – “Goals” view in Microsoft Planner
For an even more granular view, see the assignments by resource or by task at a daily, weekly, monthly, or yearly level.
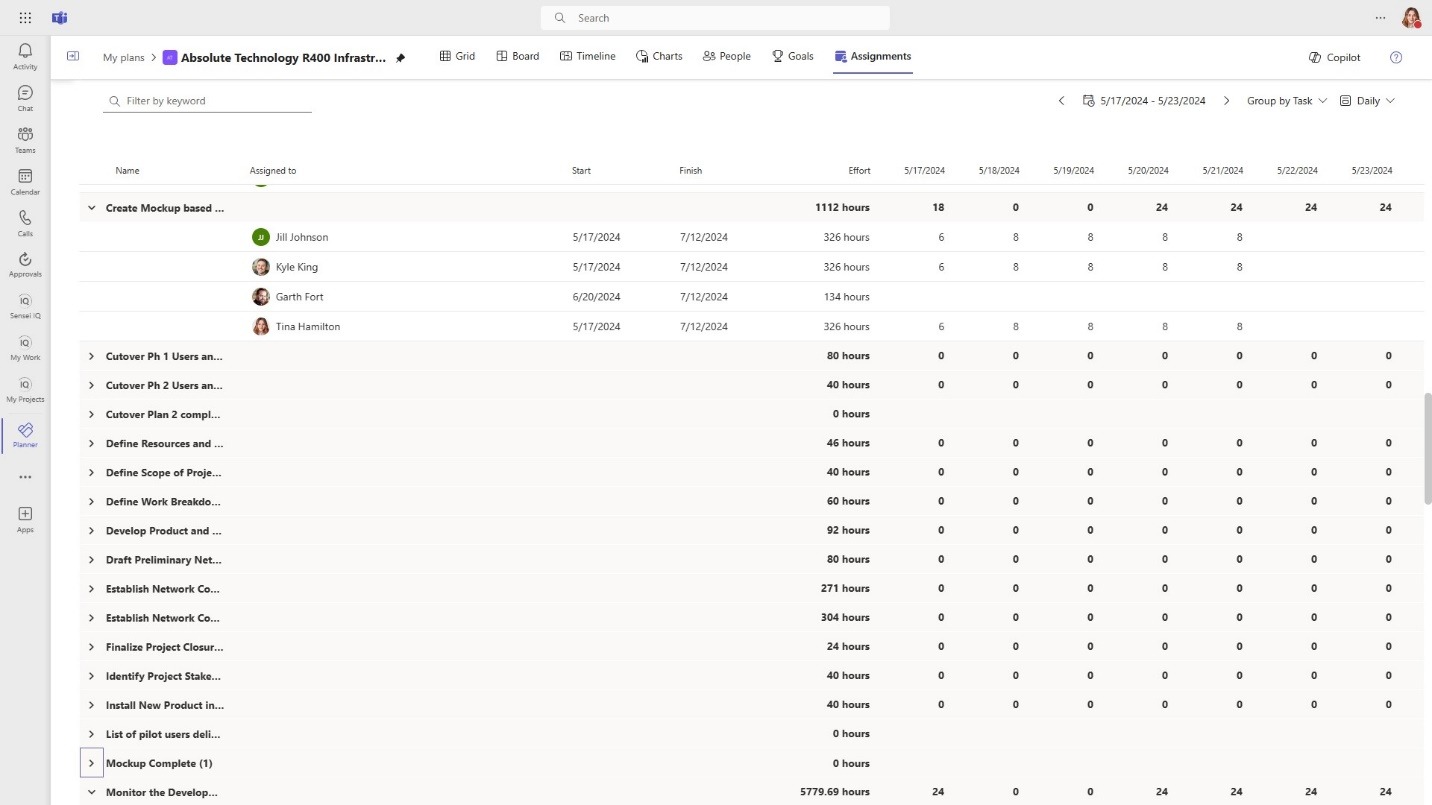
Figure 10 – “Assignments” view in Microsoft Planner
One of the most recent additions is baselining in premium plans. We can now capture a baseline for the project and all the tasks within it. For a more detailed rundown of this feature, see our blog Baseline feature in the New Microsoft Planner.
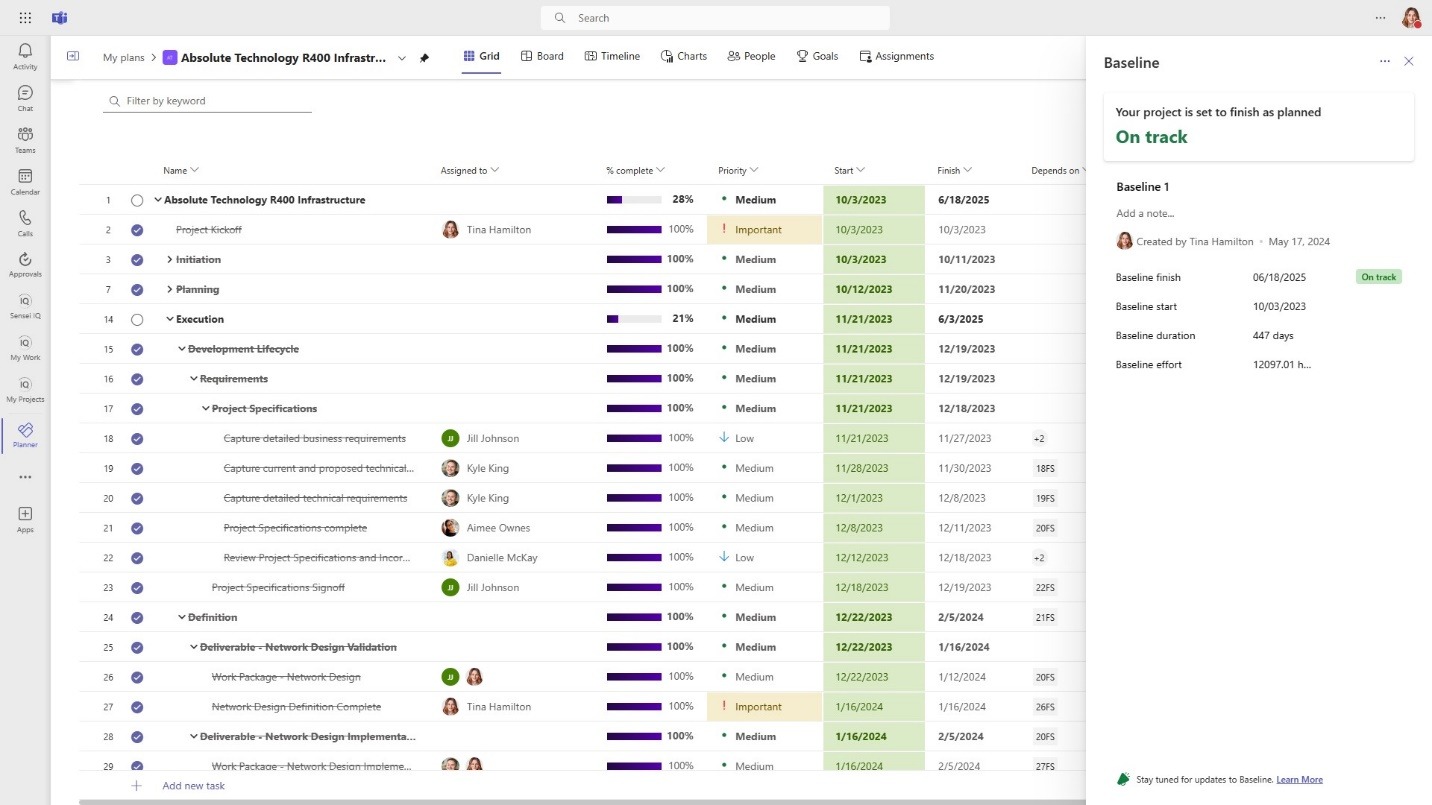
Figure 11 – Baselining in Microsoft Planner
The filters are great for larger schedules when you’re trying to find a subset of tasks quickly.
You can filter the views for ‘Sprints’, ‘Finish Date’, ‘Progress’, ‘Labels’, ‘Buckets’, ‘Priority’, ‘Critical path’, ‘Goals’, who the work is ‘Assigned to’, and also certain custom fields you may have created like the ‘Value’ field shown below.
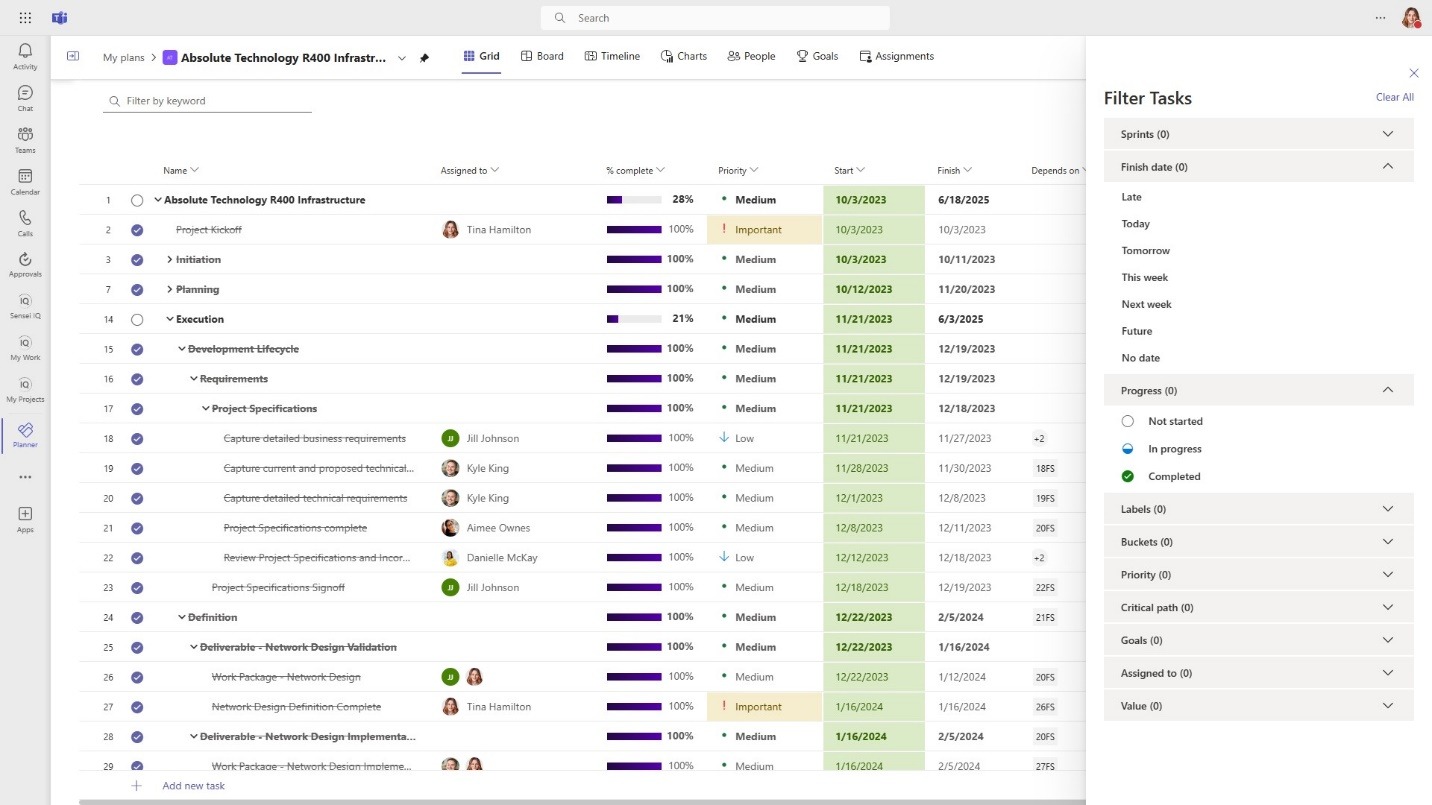
Figure 12 – Filter Tasks in Microsoft Planner
I personally find coloring very helpful, so the option to do ‘Conditional Coloring’ in the grid view helps quickly make sense of the data.
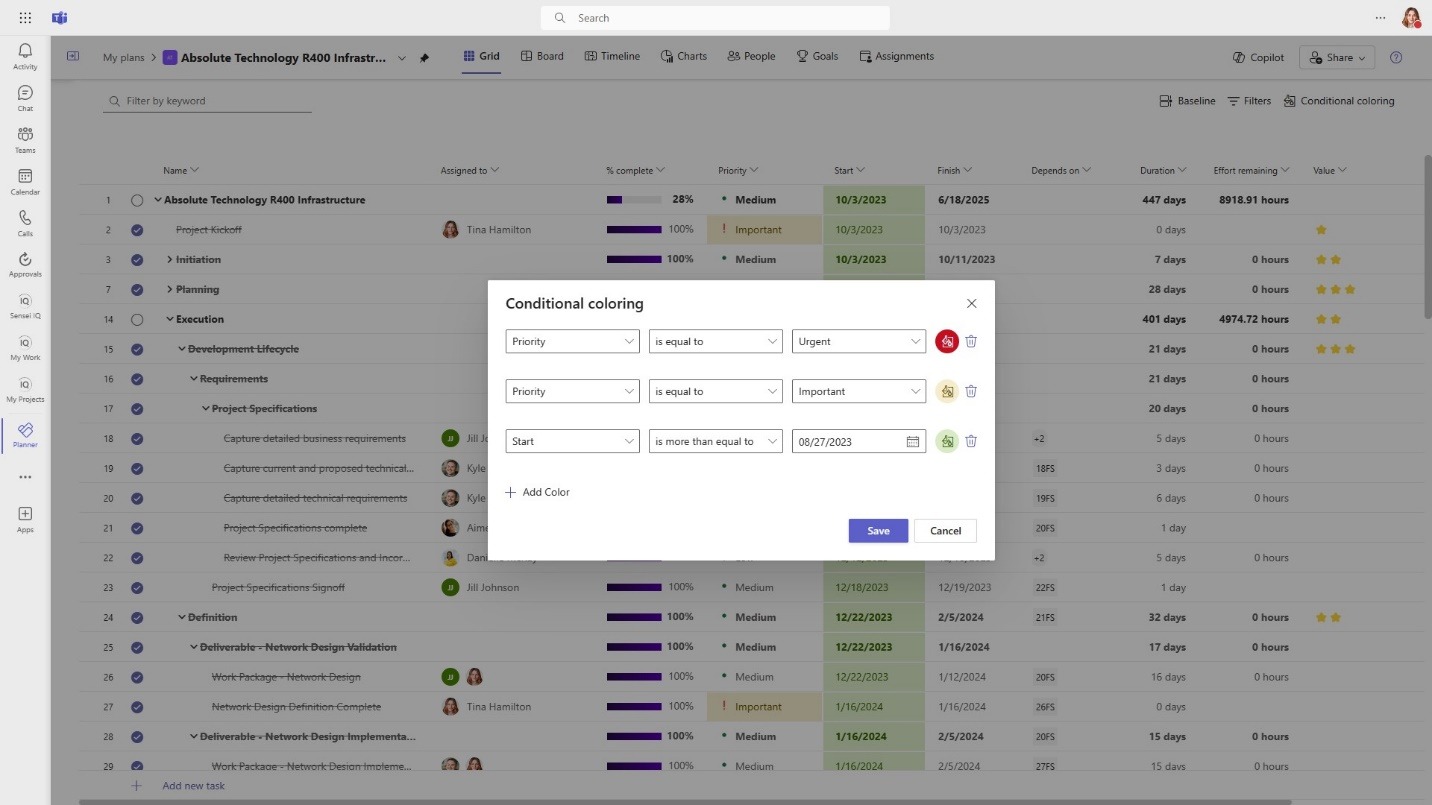
Figure 13 – Conditional Coloring in Microsoft Planner
Related:
Recorded Demo: Project & Portfolio Management in M365
Planner makes excellent use of Copilot for Artificial Intelligence. With simple, natural-language prompts, Copilot in Planner will help you with a number of different things. For example, if I ask about my next status meeting, Copilot will check my calendar and show the next appointment related to this project. You can even ask Copilot to help you with goal setting, so everyone knows what you’re working towards. I’ll provide another example of Copilot when I demonstrate creating a new schedule below.
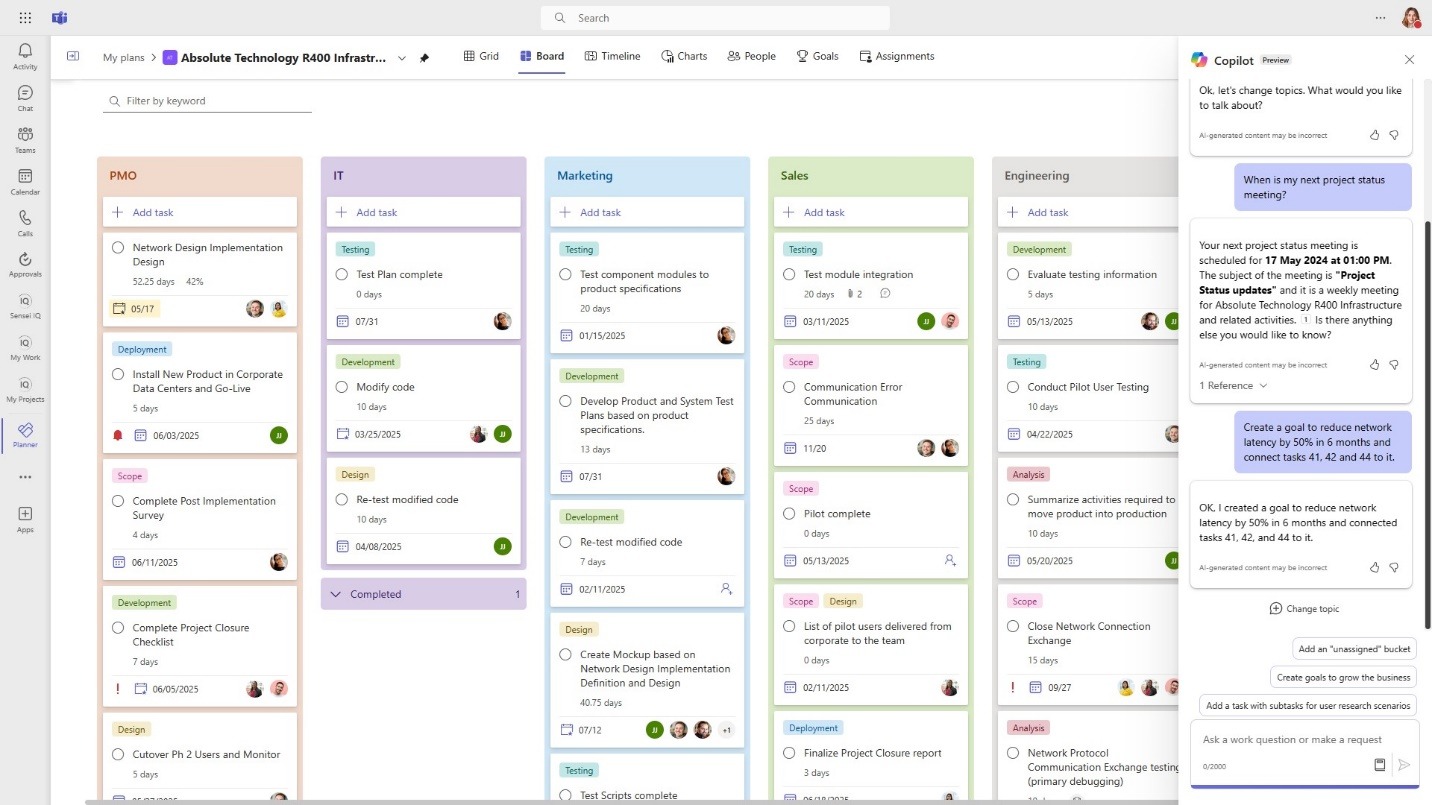
Figure 14 – Copilot in Microsoft Planner
Alright, that’s a super quick walkthrough of what’s inside of a Premium plan. Let’s bring it up a level again and look at how you create a new plan and use templates.
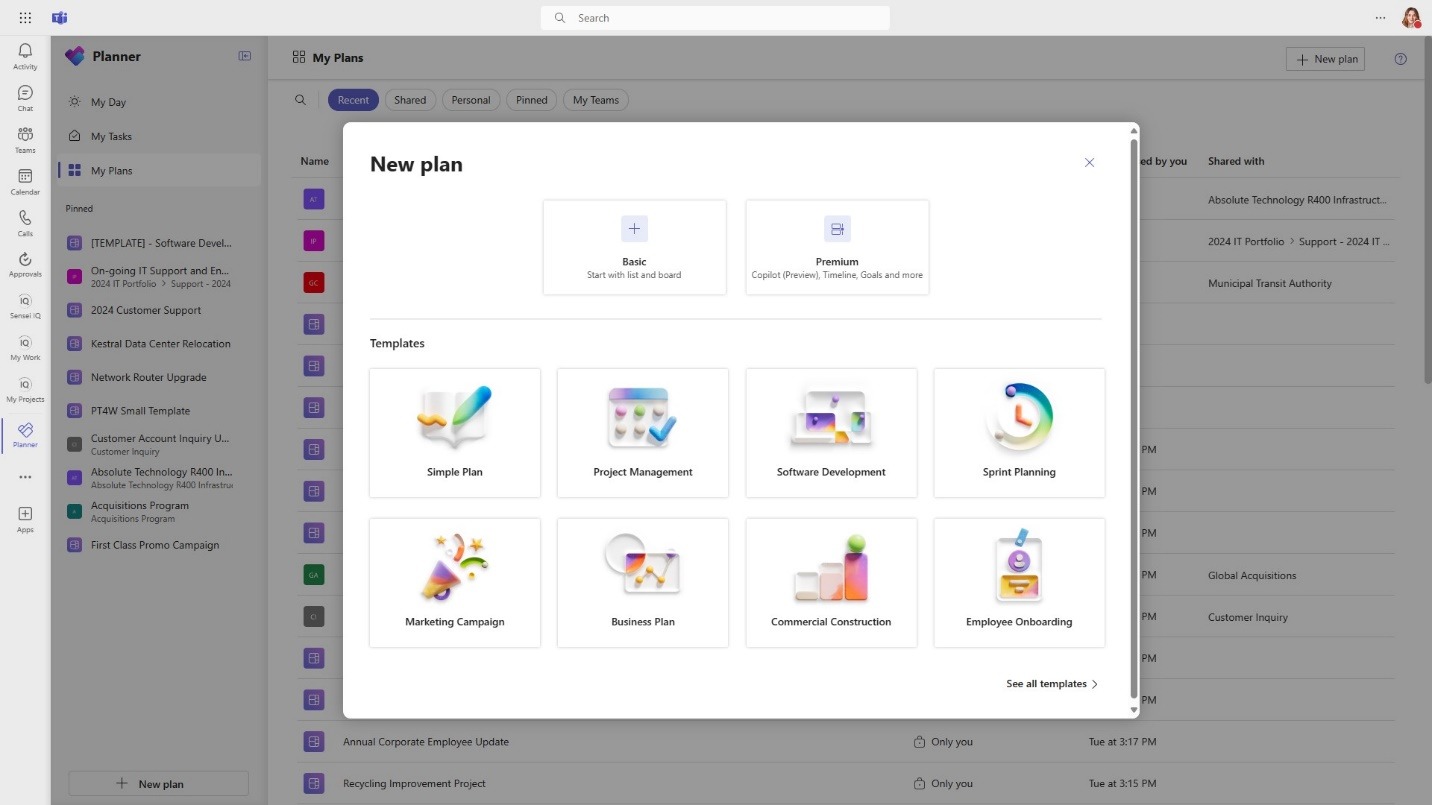
Figure 15 – Creating a new plan in Microsoft Planner
When creating a new plan, you get a choice between a blank basic or a blank premium plan, unless you want to start from a template; and these also come in basic and premium versions. The built-in templates are fine, but we really need Microsoft to allow us to upload custom, enterprise templates. That will be extremely helpful. In the meantime, you can create a plan with TEMPLATE in the name and copy it from the drop-down next to the name.
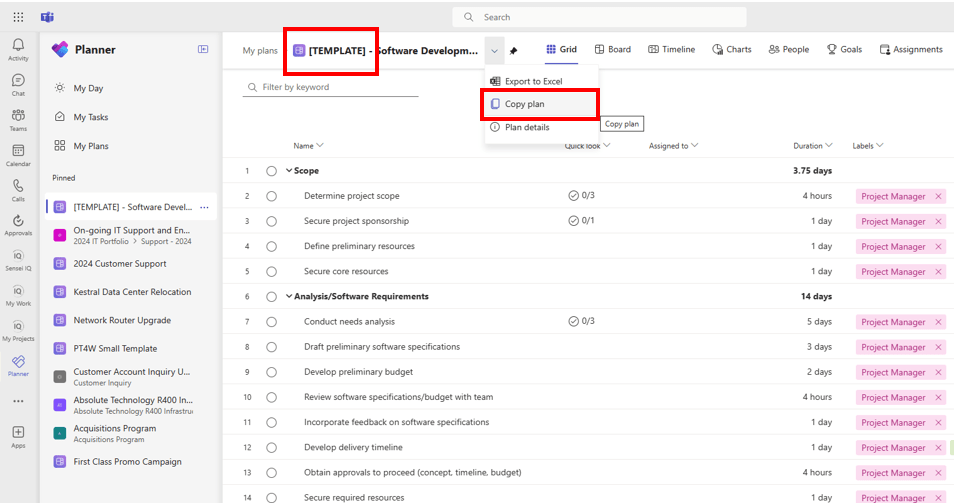
Figure 16 – New plan template in Microsoft Planner
For now, we’ll create a blank premium plan for the Madison Avenue Sidewalk Expansion. When creating a plan you also get the option to pin it to the left hand menu for easy access. Again, Copilot can help save you time by creating relevant tasks quickly. Simply tell Copilot what you would like to accomplish, and it will add a set of tasks to your plan. The level of detail and quality will only get better over time, but this is a good start.
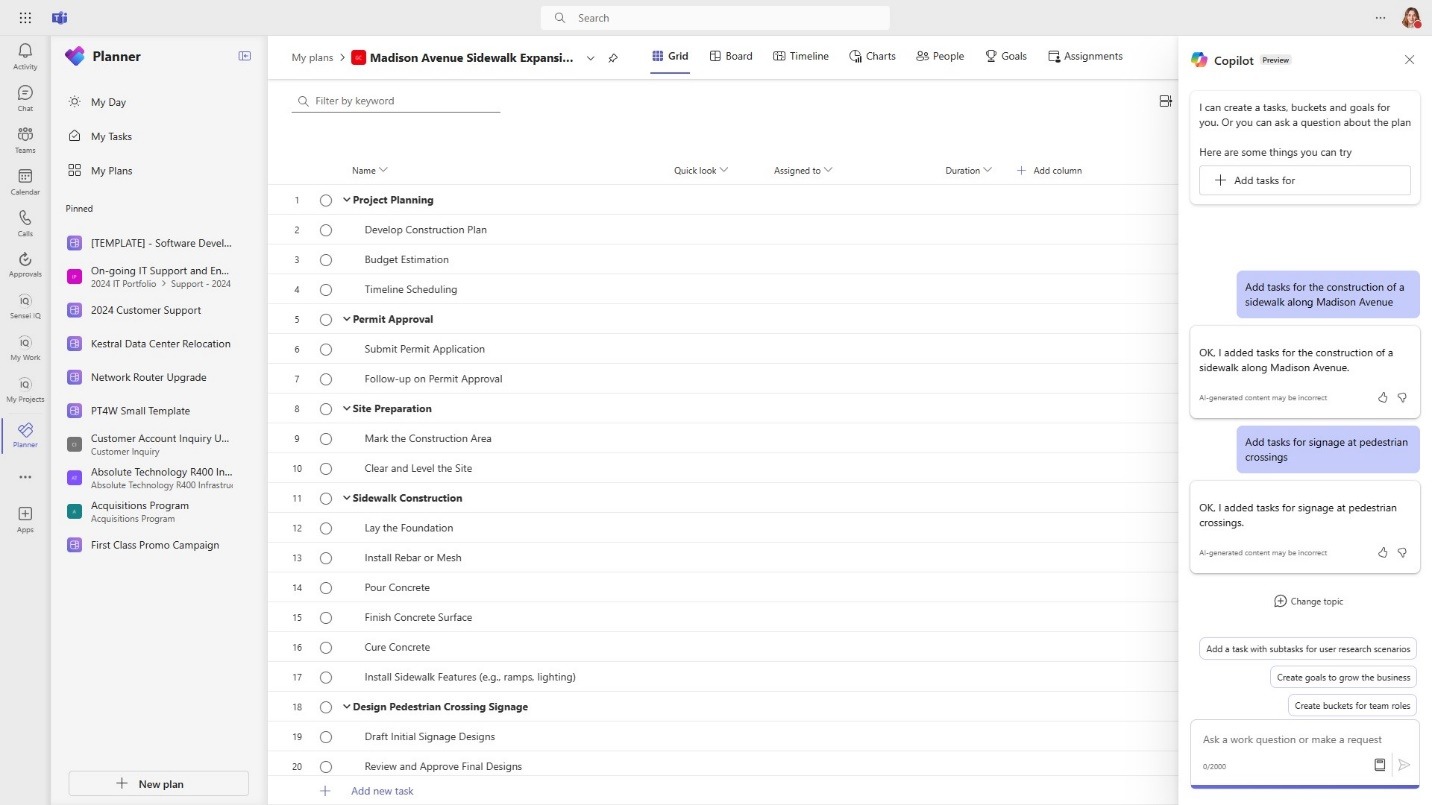
Figure 17 – New plan in Microsoft Planner
With the steps I’ve recommended so far, this plan is private and available only to you. If you want to share it with others, you’ll need to either create a new Microsoft 365 Group and add members to it, or add the plan to an existing group which already has team members.
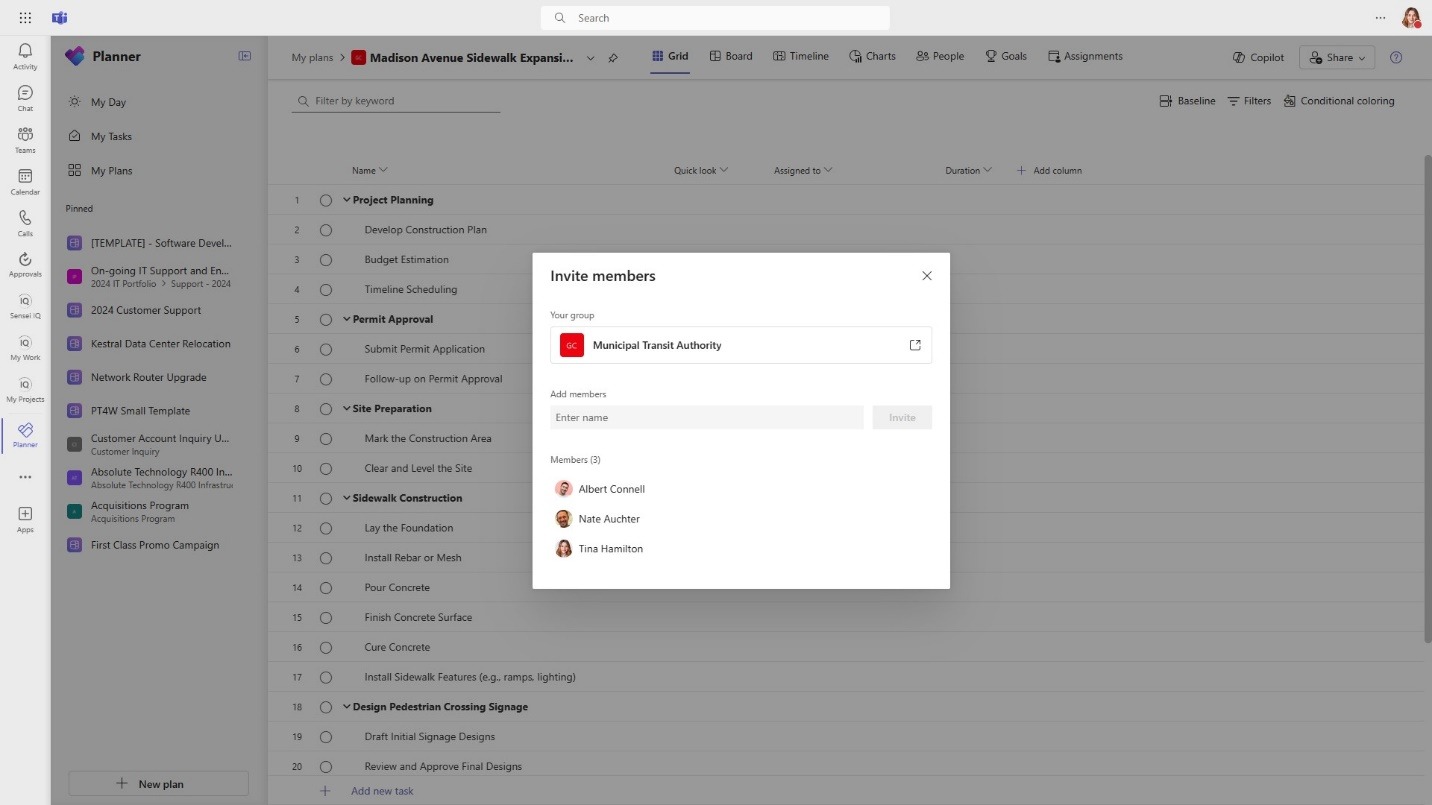
Figure 18 – Adding members to a plan in Microsoft Planner
This is not just about sharing the plan with others though. Adding a Microsoft 365 group also puts in place all the infrastructure you need behind the scenes, including a SharePoint Team Site with a document library to store your files. You get the ability to create a channel in Microsoft Teams for the project with a shared e-mail address and a project calendar.
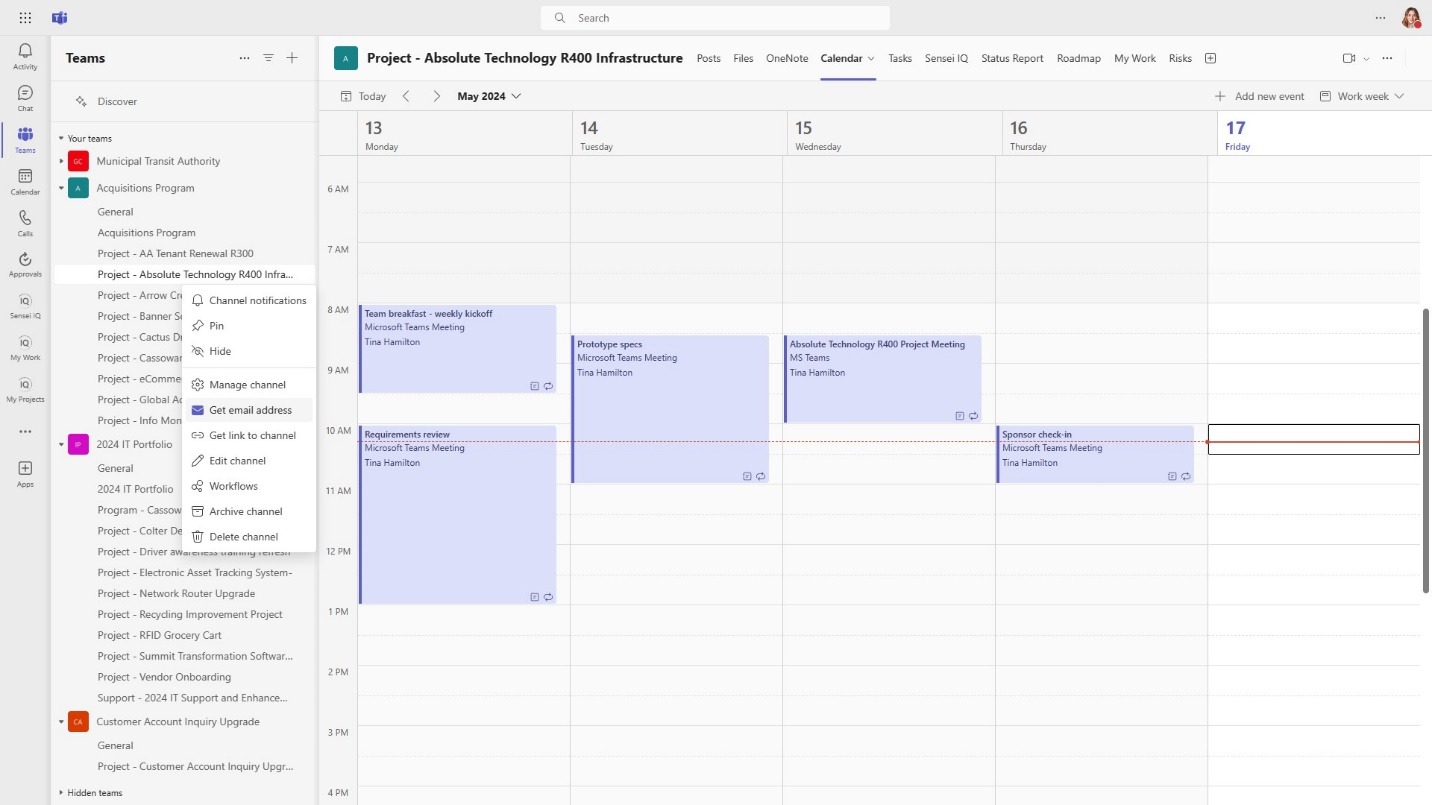
Figure 19 – Shared project calendar in Microsoft Planner
The core work management capabilities from Microsoft have really come a long way and are very competitive, as you’ve just seen in the new Planner. When used in combination with Microsoft Teams, each project then gets a dedicated channel for collaboration.
A ‘Team’ typically represents a group of people already working together. This could be a department, a program, or a portfolio, for example. Then, within that Team, each channel represents a project; that means you get an e-mail address and a calendar for the project; and the ability to follow any activity on the project from the posts tab. You can access the files that are stored in SharePoint, and capture notes in OneNote, in addition to the tasks from the plan.
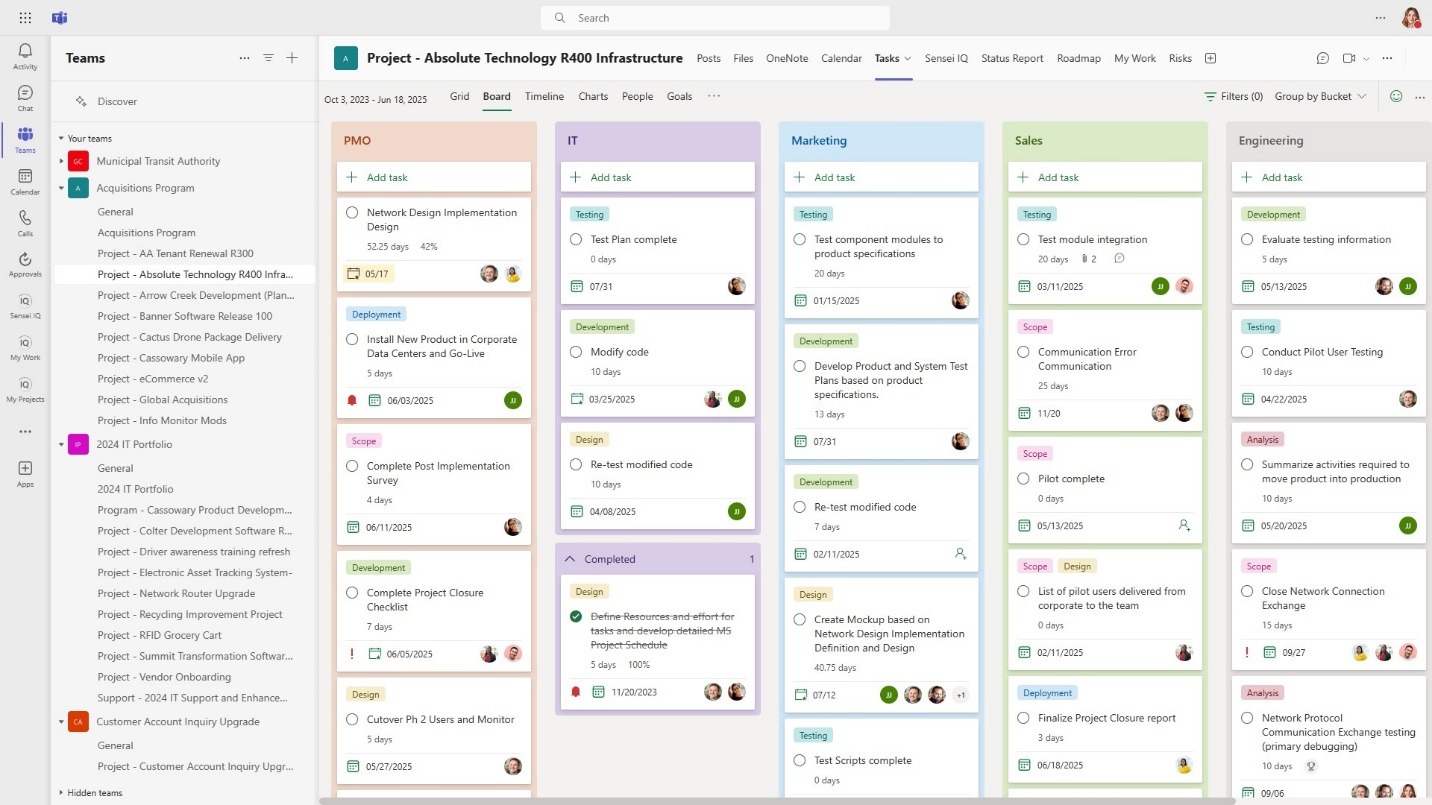
Figure 20 – Project tasks in Microsoft Planner
Since premium plans come from what was previously Microsoft Project for the web, you have the entire Power Platform available to you for extensions and reporting. That means you can add features and capabilities on top of the tasks in the plan. This is what really completes the platform for work, project, and portfolio management.
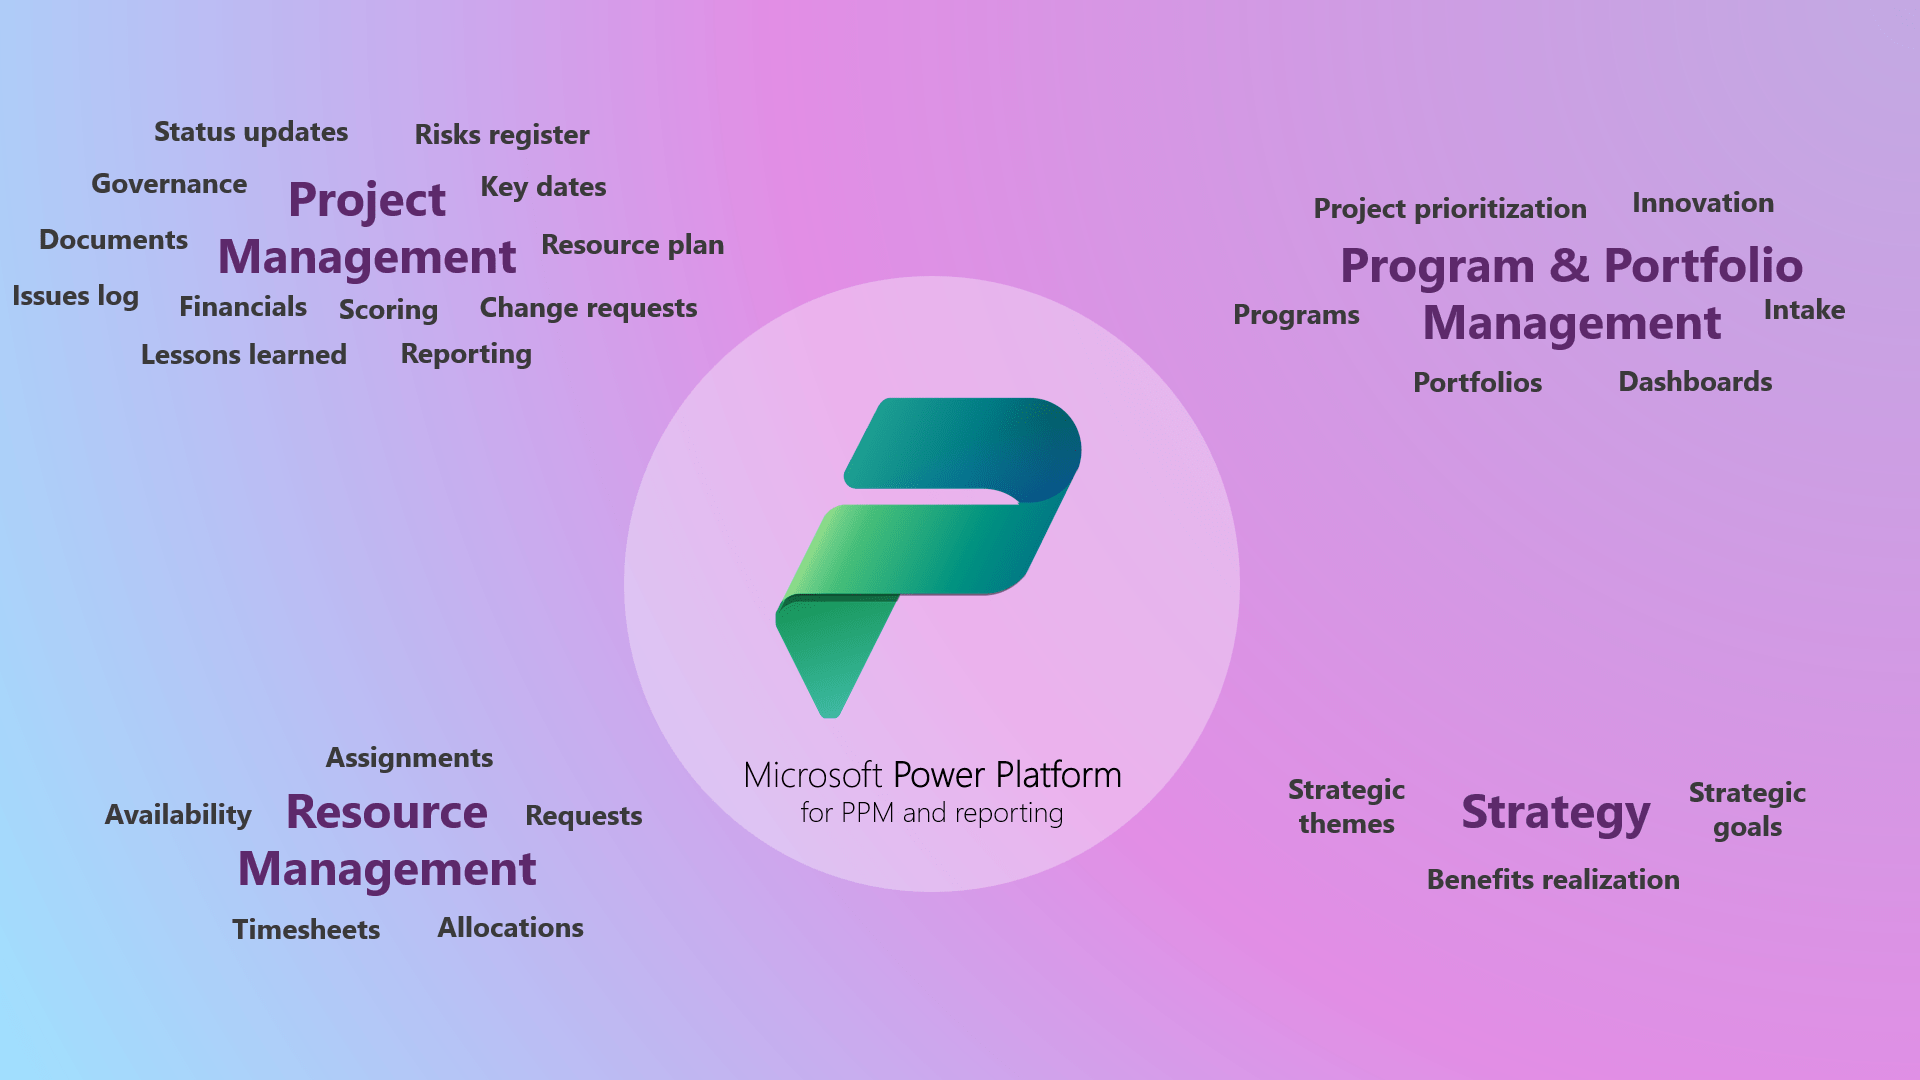
At Sensei, we’ve built a best-practices template on the Power Platform with the most common extensions and reporting packs. For Project Management, that includes governance workflows for projects with built-in approvals, Key Dates, Project Financials, Deliverables, Status Updates, Issues and Risks, Decisions, Change Requests, and Lessons Learned. It also includes automated reporting for the individual project and aggregated to show a view of all work in the organization. Project Managers even get their own app that shows all activity and people on the projects they’re responsible for.
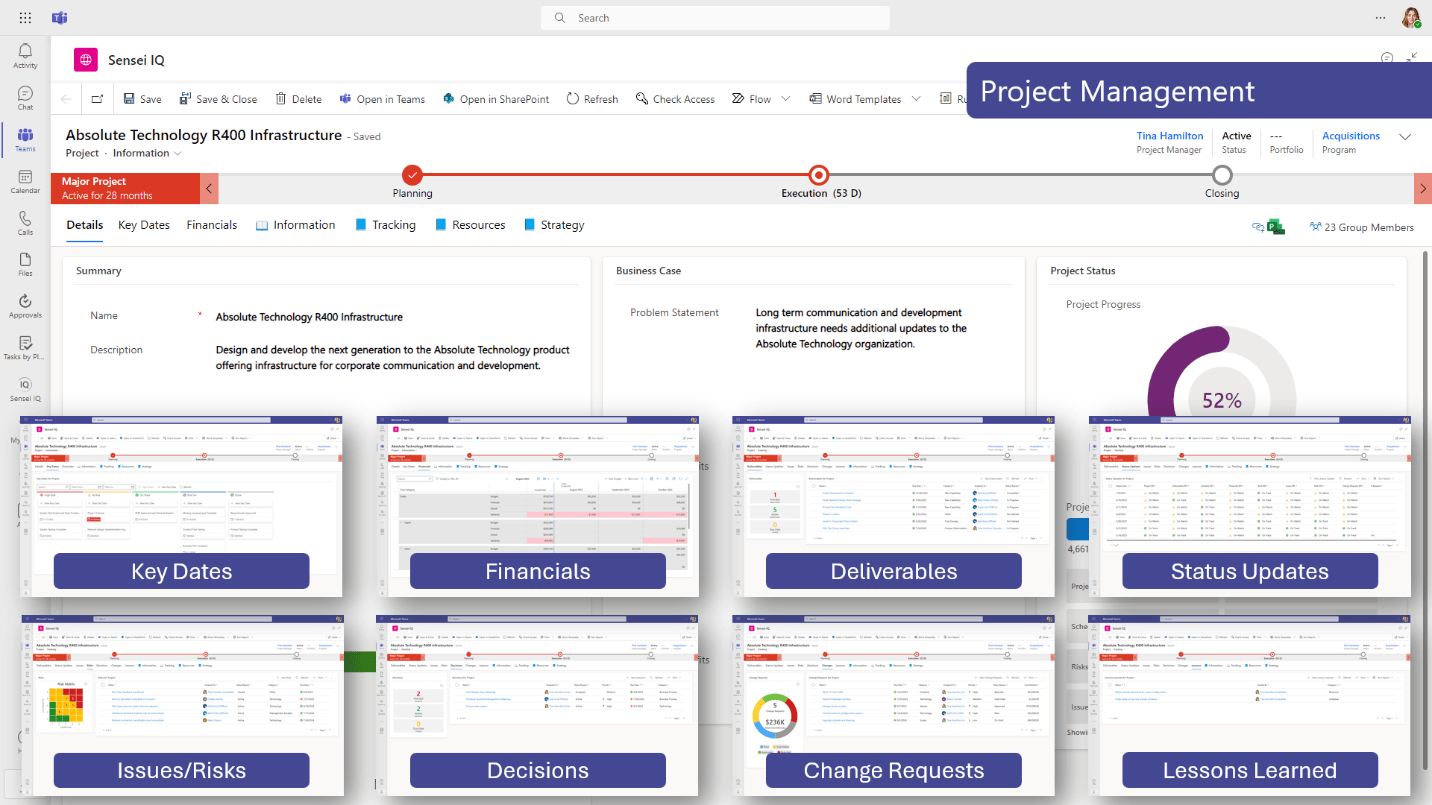
Figure 21 – Project Management on the Power Platform
For Program and Portfolio Management, there is a standard intake process with Business Case, Timelines, Resource Demand, Scoring, Prioritization and Resource Forecast – all to help organizations select the right projects. There’s the ability to issue challenges and capture ideas for on-going innovation, and, of course, the ability to formally manage programs and portfolios with reporting that visualize it all.
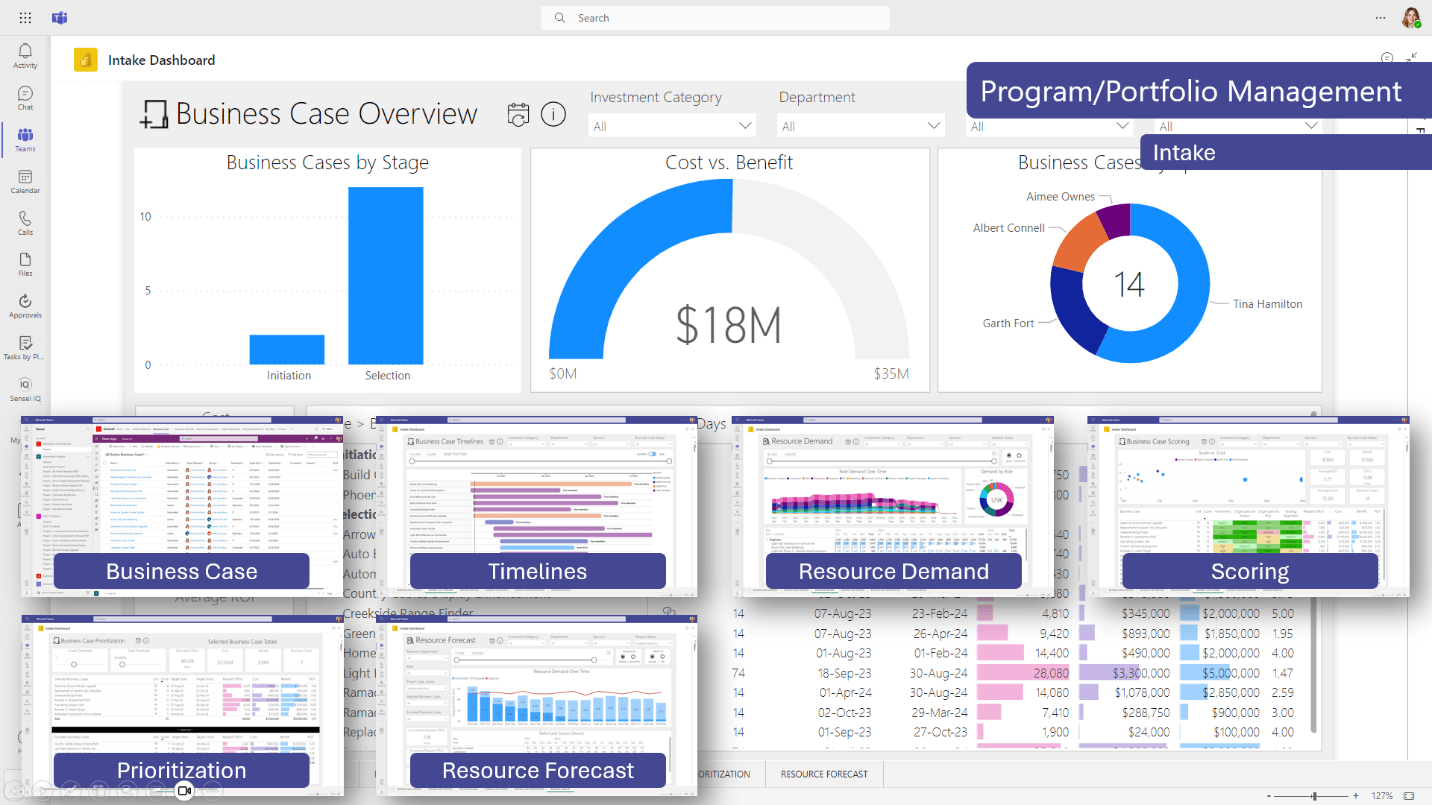
Figure 22 – Program and Portfolio Management on the Power Platform
For Resource Management, you can see availability across your teams, as well as formally request and allocate resources to projects. Team members can track their time for cross-charging, or to capitalize labor expenses. Reporting pulls it all together for visibility into bottlenecks and exceptions.
Figure 23 – Resource Management on the Power Platform
For Strategy, you can define your organization’s strategic themes, track which projects help to move the needle, and measure progress through strategic goals. You may also choose to track benefits realization well beyond the completion of the work.
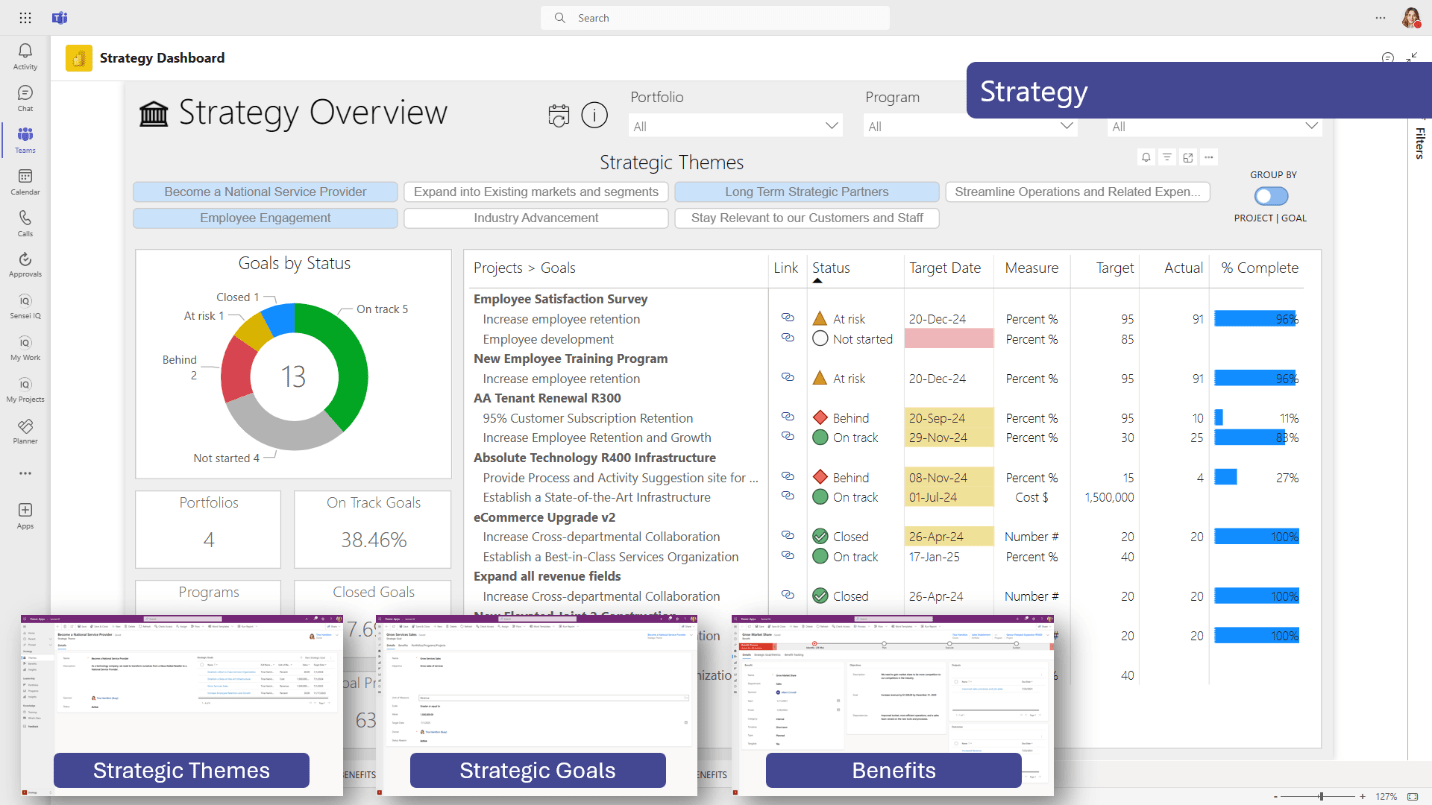
Figure 24 – Strategy on the Power Platform
Microsoft’s new approach is not only feature rich and very capable; but in leading with the platform, all of the apps you use live inside your existing Microsoft 365 tenant. That’s important, because it means users are authenticated there and all the data lives there too. You’re no longer dealing with third party providers where your data lives in someone else’s cloud.
To learn more about how Sensei IQ™ extends Microsoft Planner to enable you to manage your projects and portfolios, contact us at info@senseiprojectsolutions.com.
")