Related: VIDEO: Project Management in Office 365 and Microsoft Teams
With the new ‘Roadmap’ capability, Microsoft ties top-down portfolio management into the existing project and program management platform that is Project Online.
Project Online is the industry leading end-to-end PPM solution for organizations, and Microsoft Project is the gold standard for project managers everywhere.
Now Roadmap allows organizations and executives to create timeline views of strategic initiatives across the enterprise. In the initial release, projects are pulled in from Project Online and Azure Boards (formerly VSTS), but in future releases, Microsoft will add support for Planner and third-party services like Jira. Users can define key dates for the overall initiative and then pull in milestones, phases, and tasks from individual projects. This provides executives with a succinct overview of how strategy is translated into execution. Roadmaps can also be created for departments or programs and shared with a specific audience, demonstrating status on progress.
With the recent launch of Project Home and now Roadmap, Microsoft provides a central location for tracking project work across the enterprise and improves communication on how business value is delivered.
 |
|
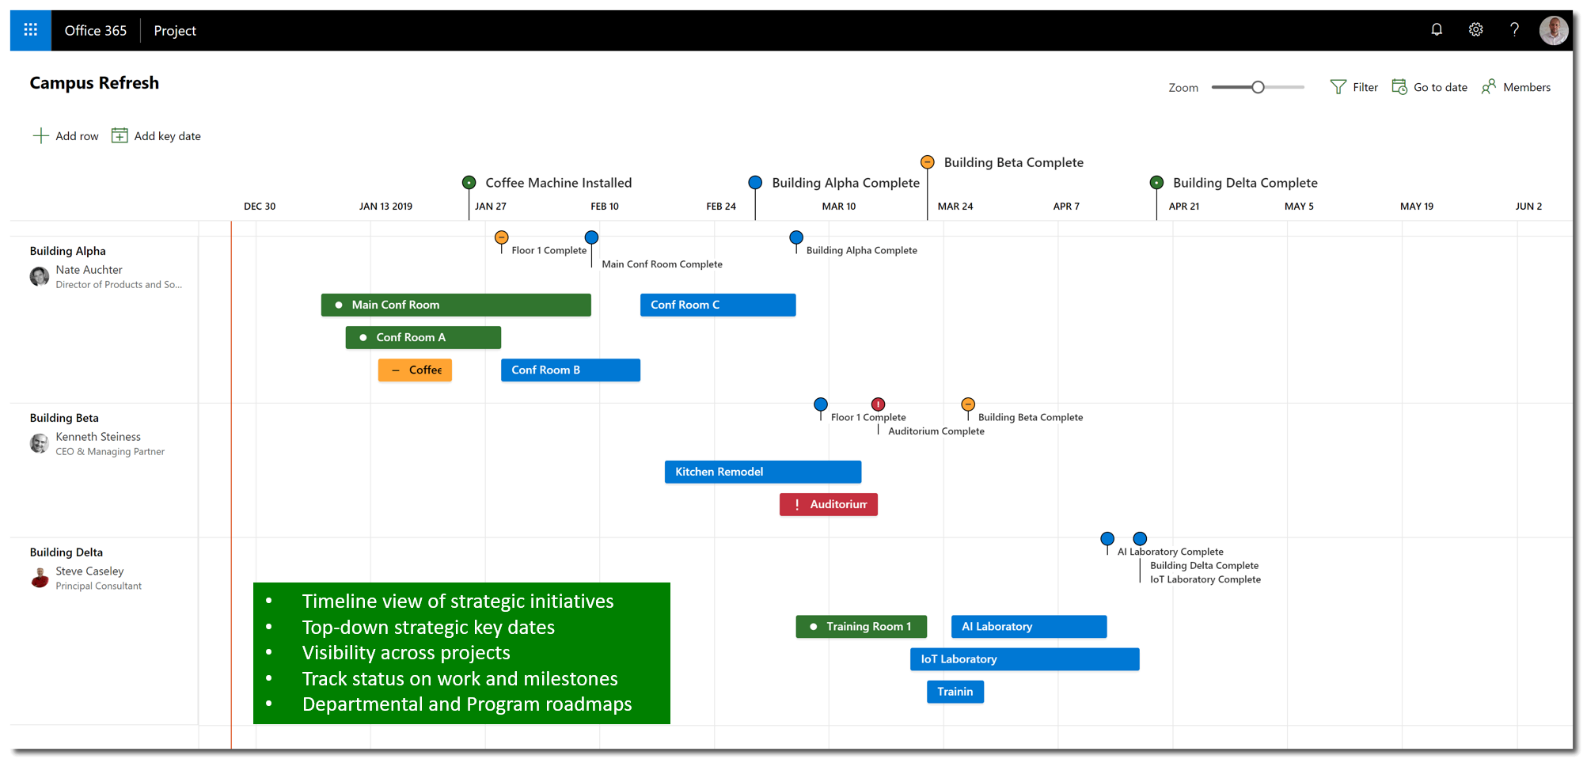
Figure 1 – Microsoft Roadmap |
We now want to take a deep dive into Roadmap’s functionalities and resources. In this article, we will use Roadmap to tell the story of an organization that is conducting a program to modernize its campus, so the PMO team wants to combine vital information from multiple projects to view the status of this program in a visual and interactive way.
Before working with Roadmap, be aware that an Office 365 administrator in your organization needs to turn it on.
To create a new roadmap, navigate to Project Home, which can be launched by accessing http://project.microsoft.com. It can also be accessed by clicking the ‘Project’ icon from the Office 365 app launcher (or waffle icon) in the top left-hand section of Office 365 page, or from the home page at http://office.com by clicking the Project icon.
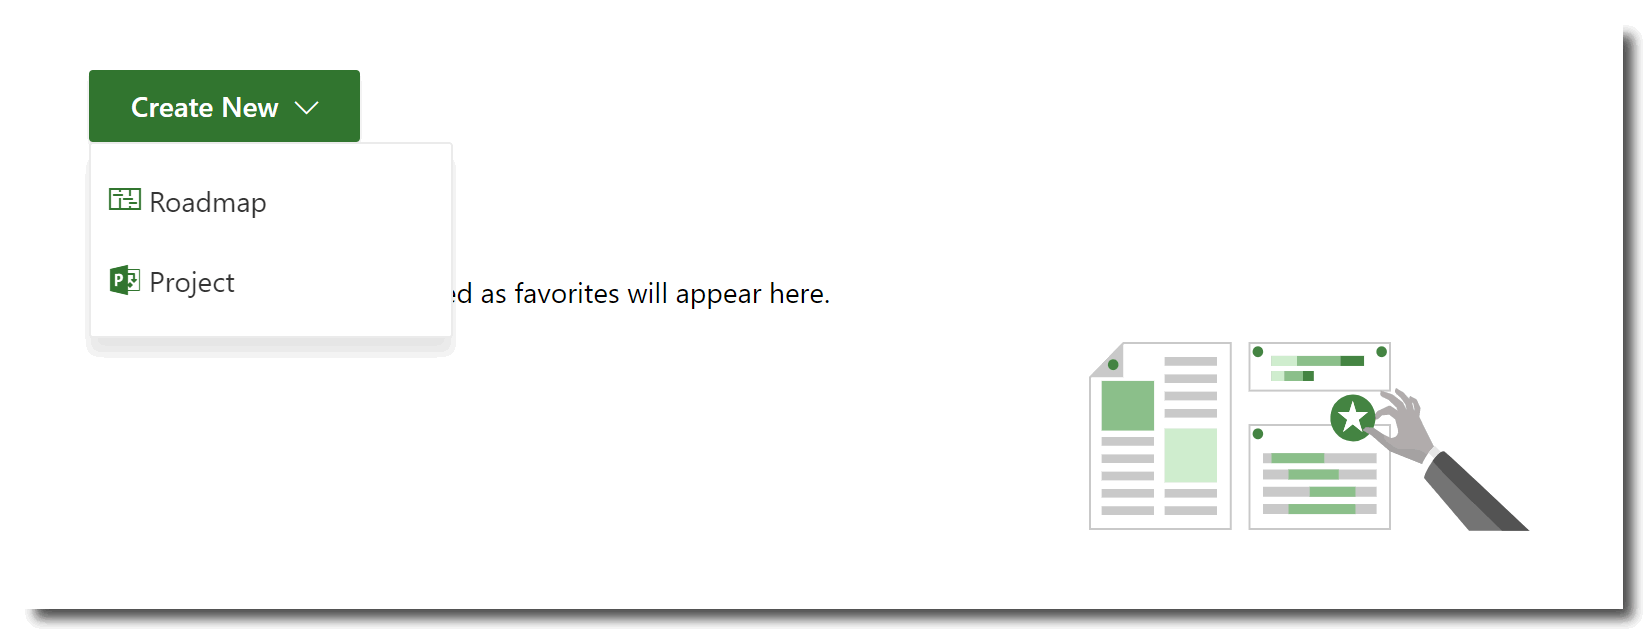
Once you are in the Project Home page, click on the Create New button and then choose Roadmap.
 |
|
Figure 2 – Project Home |
 |
|
Figure 3 – Creating a new Roadmap |
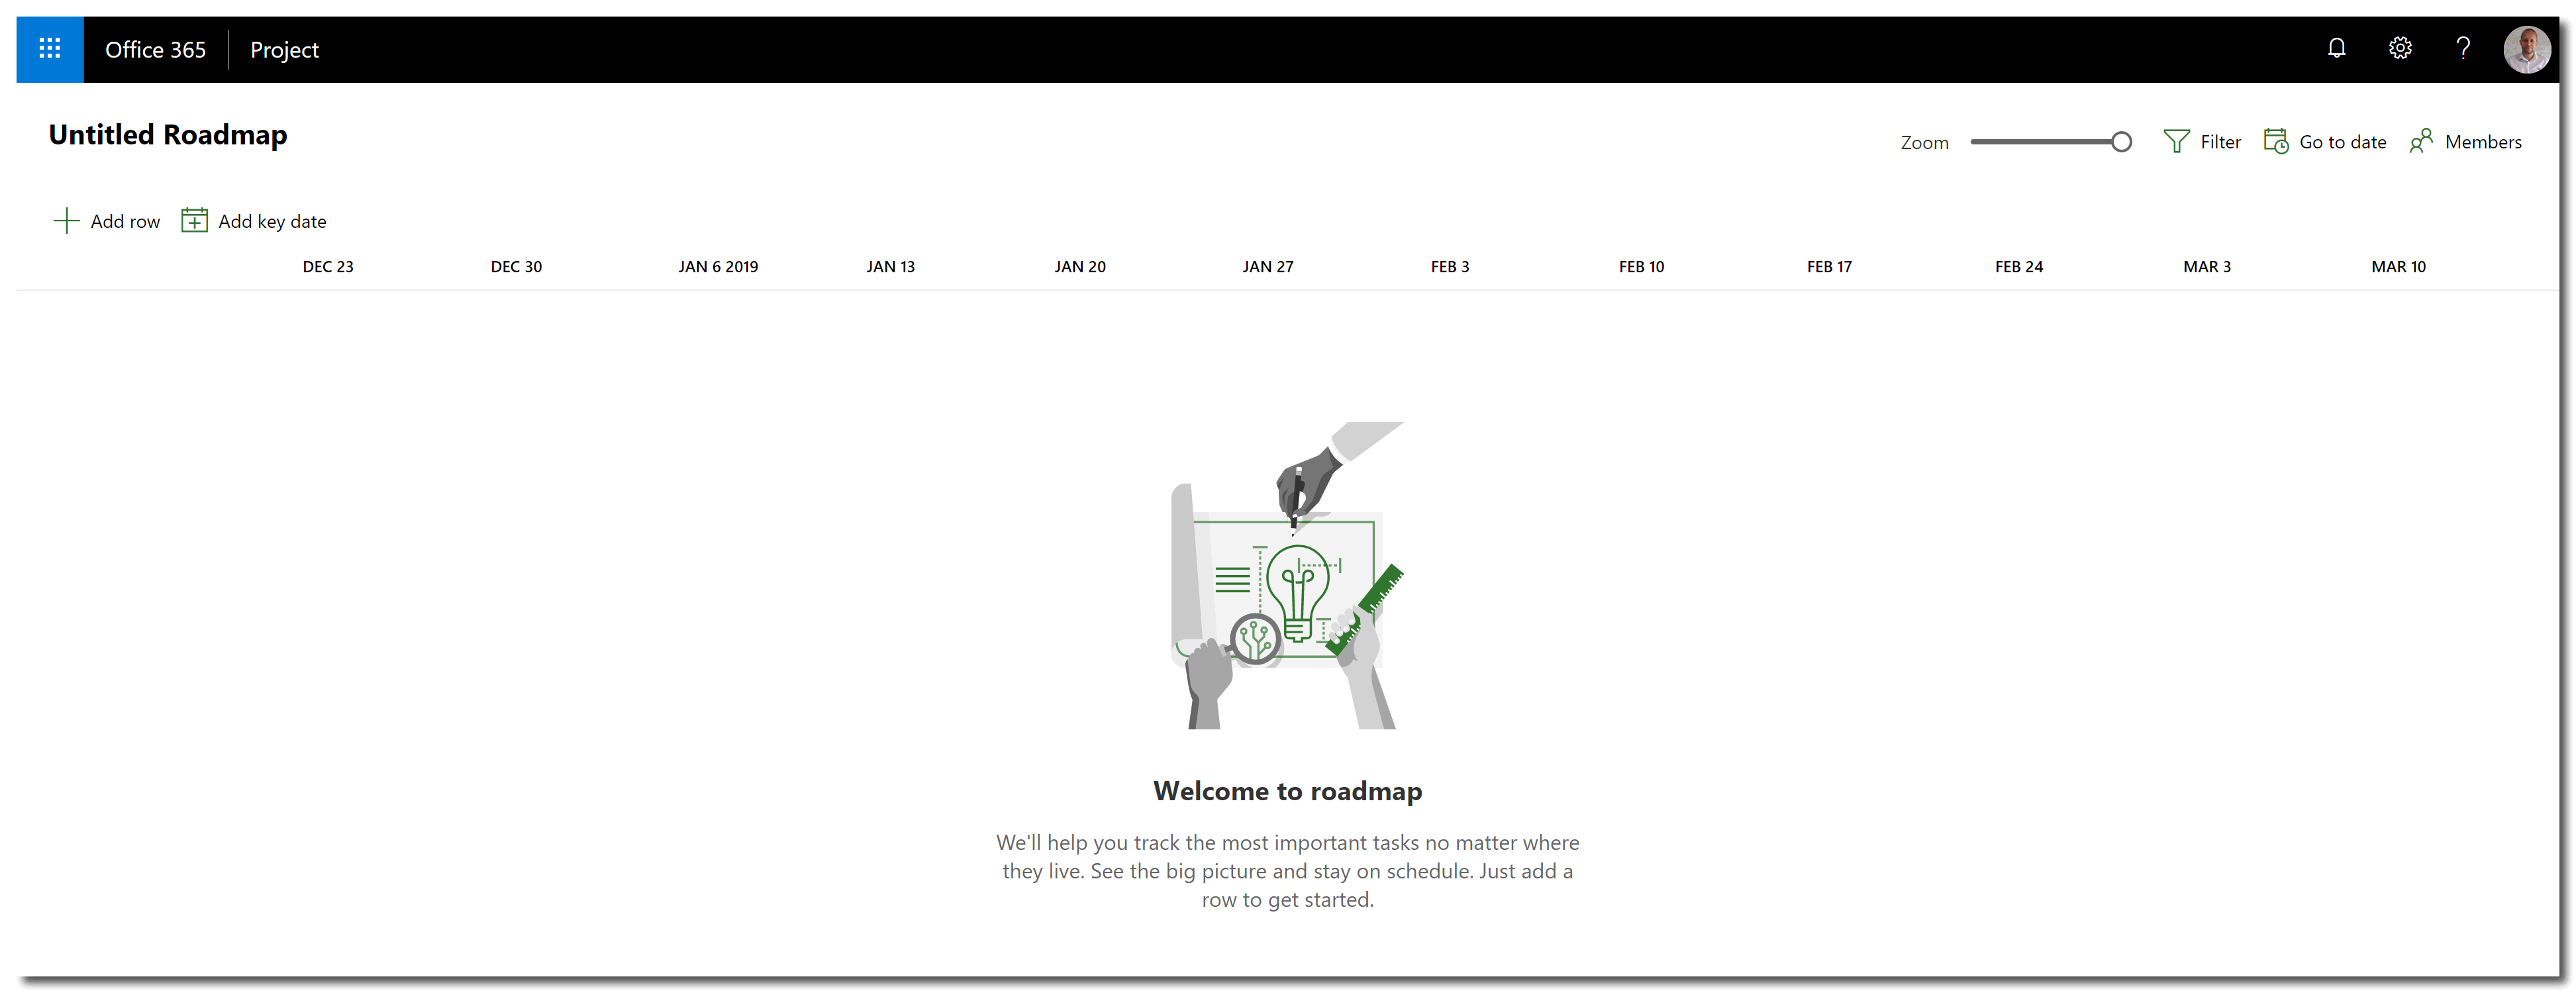
When a new roadmap is created, a blank canvas is presented. The canvas layout is clean and intuitive, representing the new modern concept that Microsoft is introducing. From left to right, the roadmap canvas provides users with the following options to configure the roadmap:
 |
|
Figure 4 – Roadmap elements |
Although you do not need to name the roadmap, we recommend always giving each roadmap a meaningful name so that it can be shared with the stakeholders. To change its name, simply click in the roadmap title and type the appropriate text.
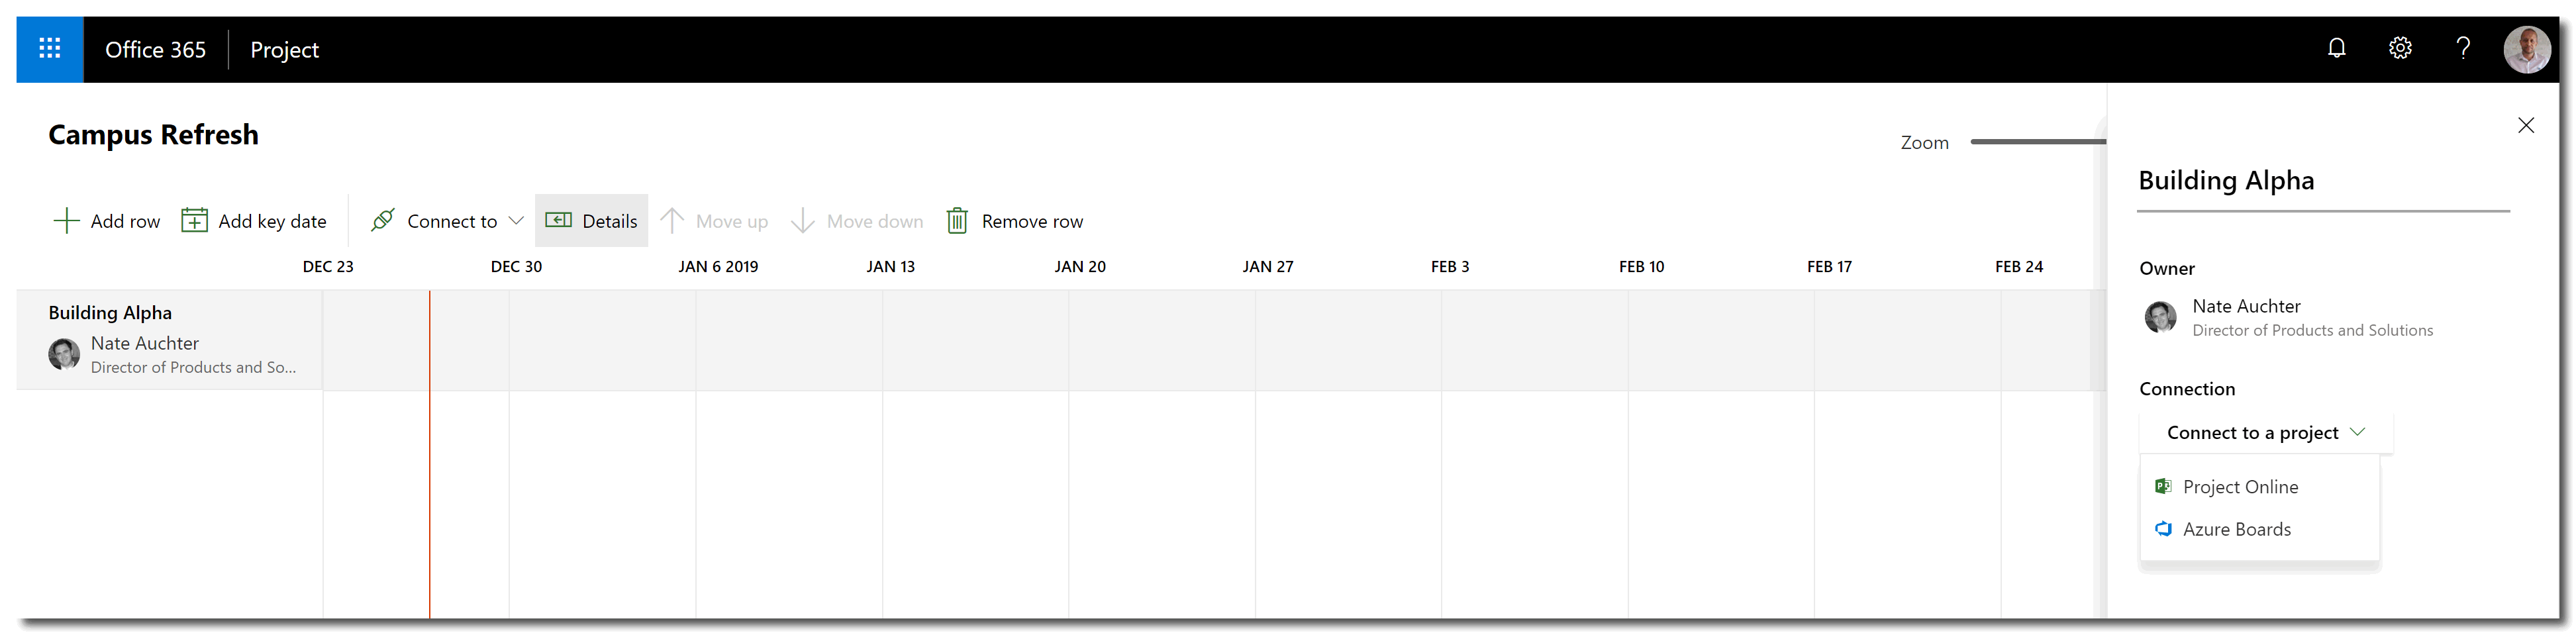
The roadmap now needs to be defined to display all the items of interest to the stakeholders. A roadmap is composed of rows which host items that can be connected to either Project Online or Azure Boards. Click on +Add row to add details to your roadmap. In the right-hand pane, name the row using a descriptive title that will be meaningful to anyone who views the roadmap. You must also specify an owner and then the data source for the row, either Project Online or Azure Boards.
 |
|
Figure 5 – Adding a row to the Roadmap |
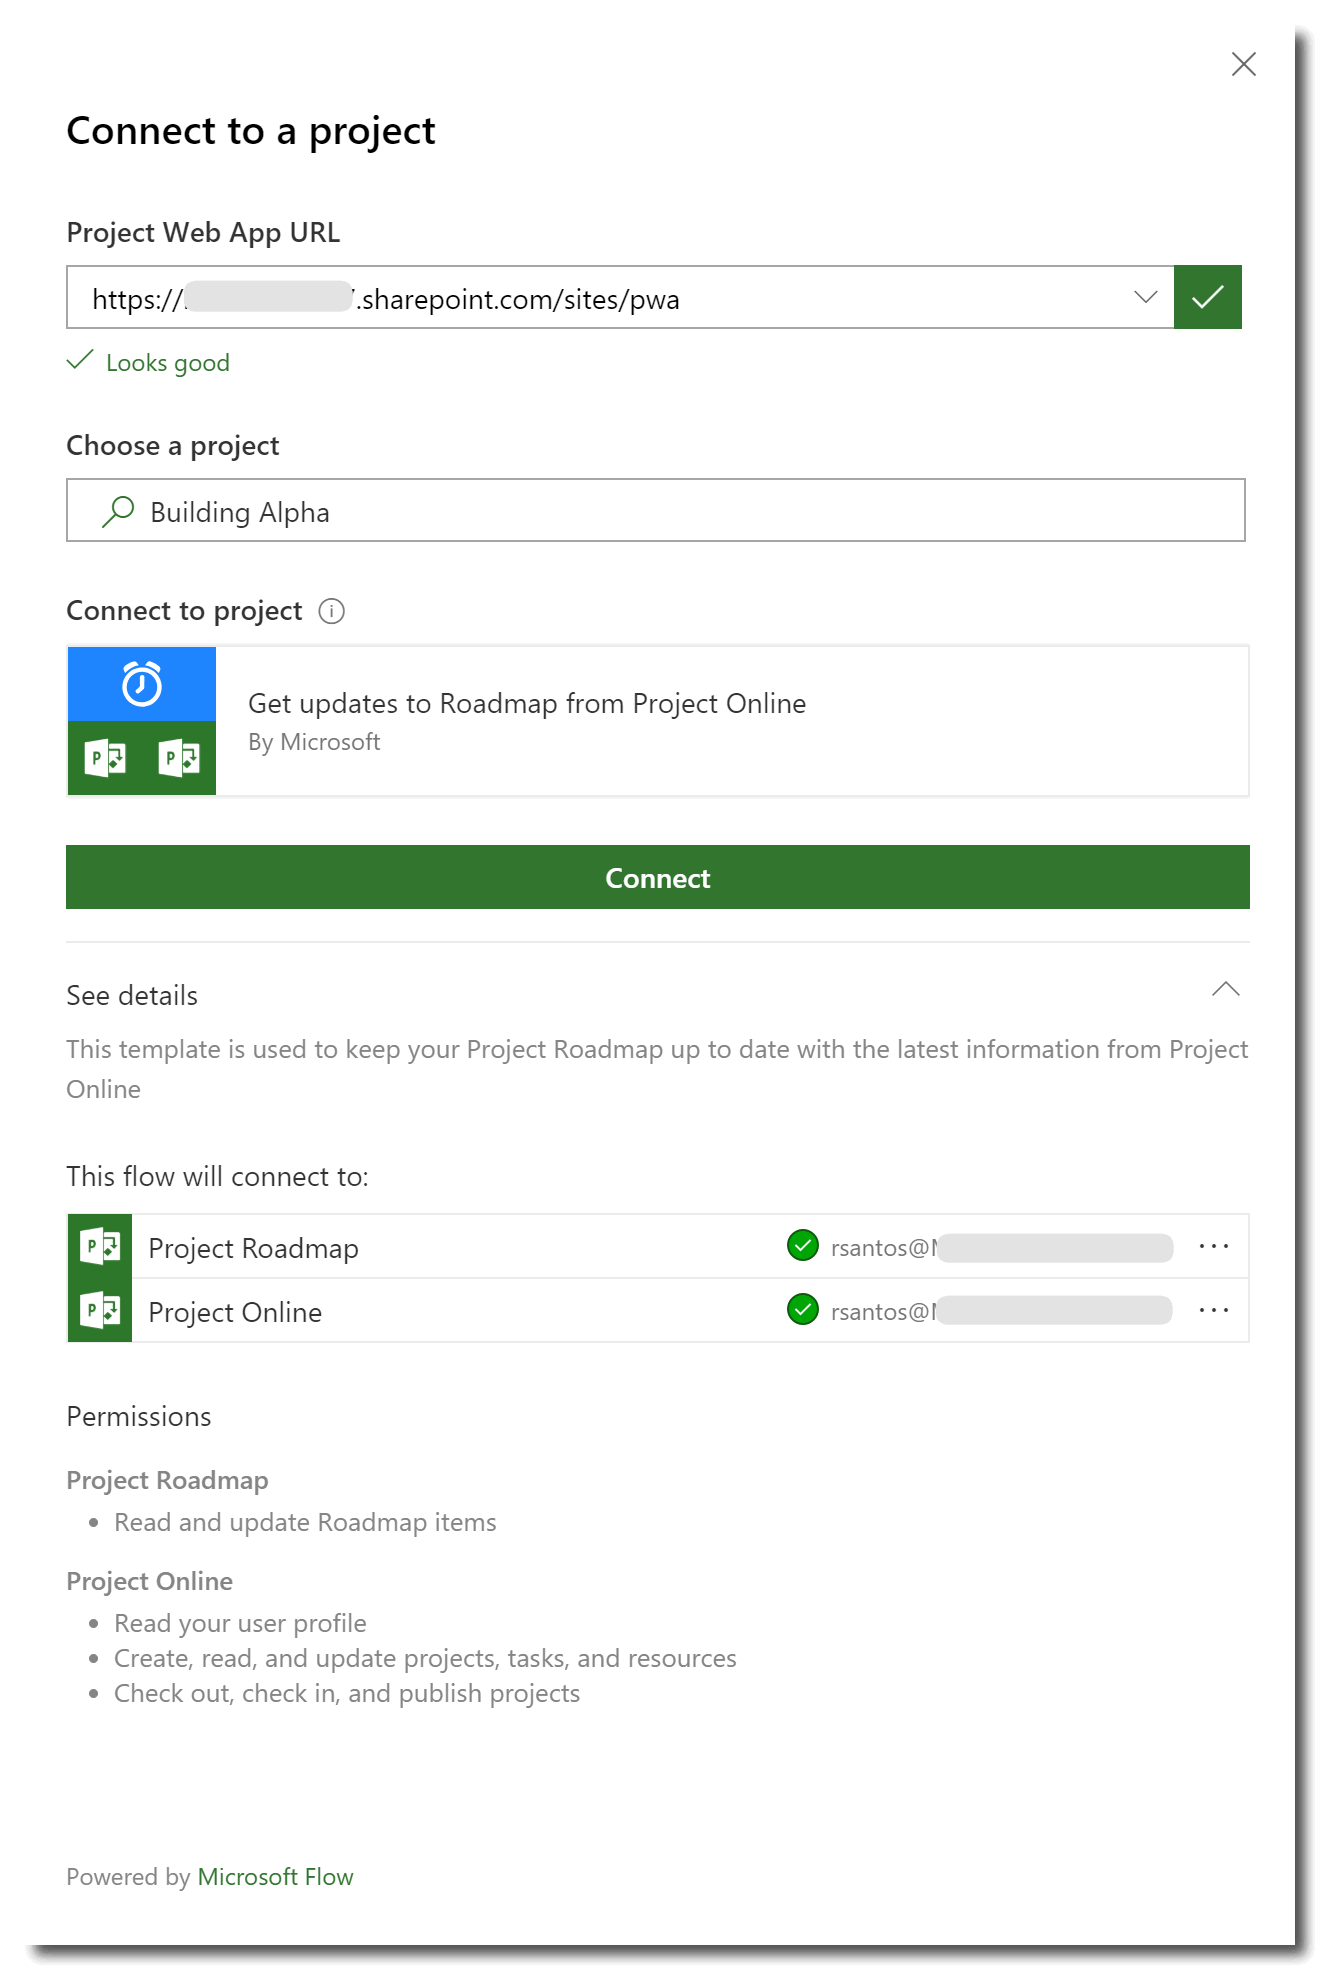
If you want to use Project Online as a data source, enter the Project Web App URL. With the connection established, you can choose a project schedule. In this first example, we will be using a project called ‘Building Alpha’.
 |
|
Figure 6 – Choosing a project |
Roadmap uses Microsoft Flow to establish a connection with Project Online. This ensures the data is always fresh if changes are made in the corresponding connected project schedule(s). Once the connection is confirmed, you can see the permissions required and change the credentials used to connect to the items.
 |
|
Figure 7 – Connection details |
When the connection is established, you can populate the row with summary tasks, detailed tasks, or milestones from the project schedule. From the Row Items page on the right, you can search for any schedule items that you want to include on the roadmap.
 |
|
Figure 8 – Adding items from the project schedule on the row |
What we really like about adding new items is the ability to freely search for important items by simply typing them in the search area.
Once you have defined all the items to be included on the row, close the dialog and validate that the row satisfies the stakeholder’s information requirements.
 |
|
Figure 9 – Tasks and milestones added to the row |
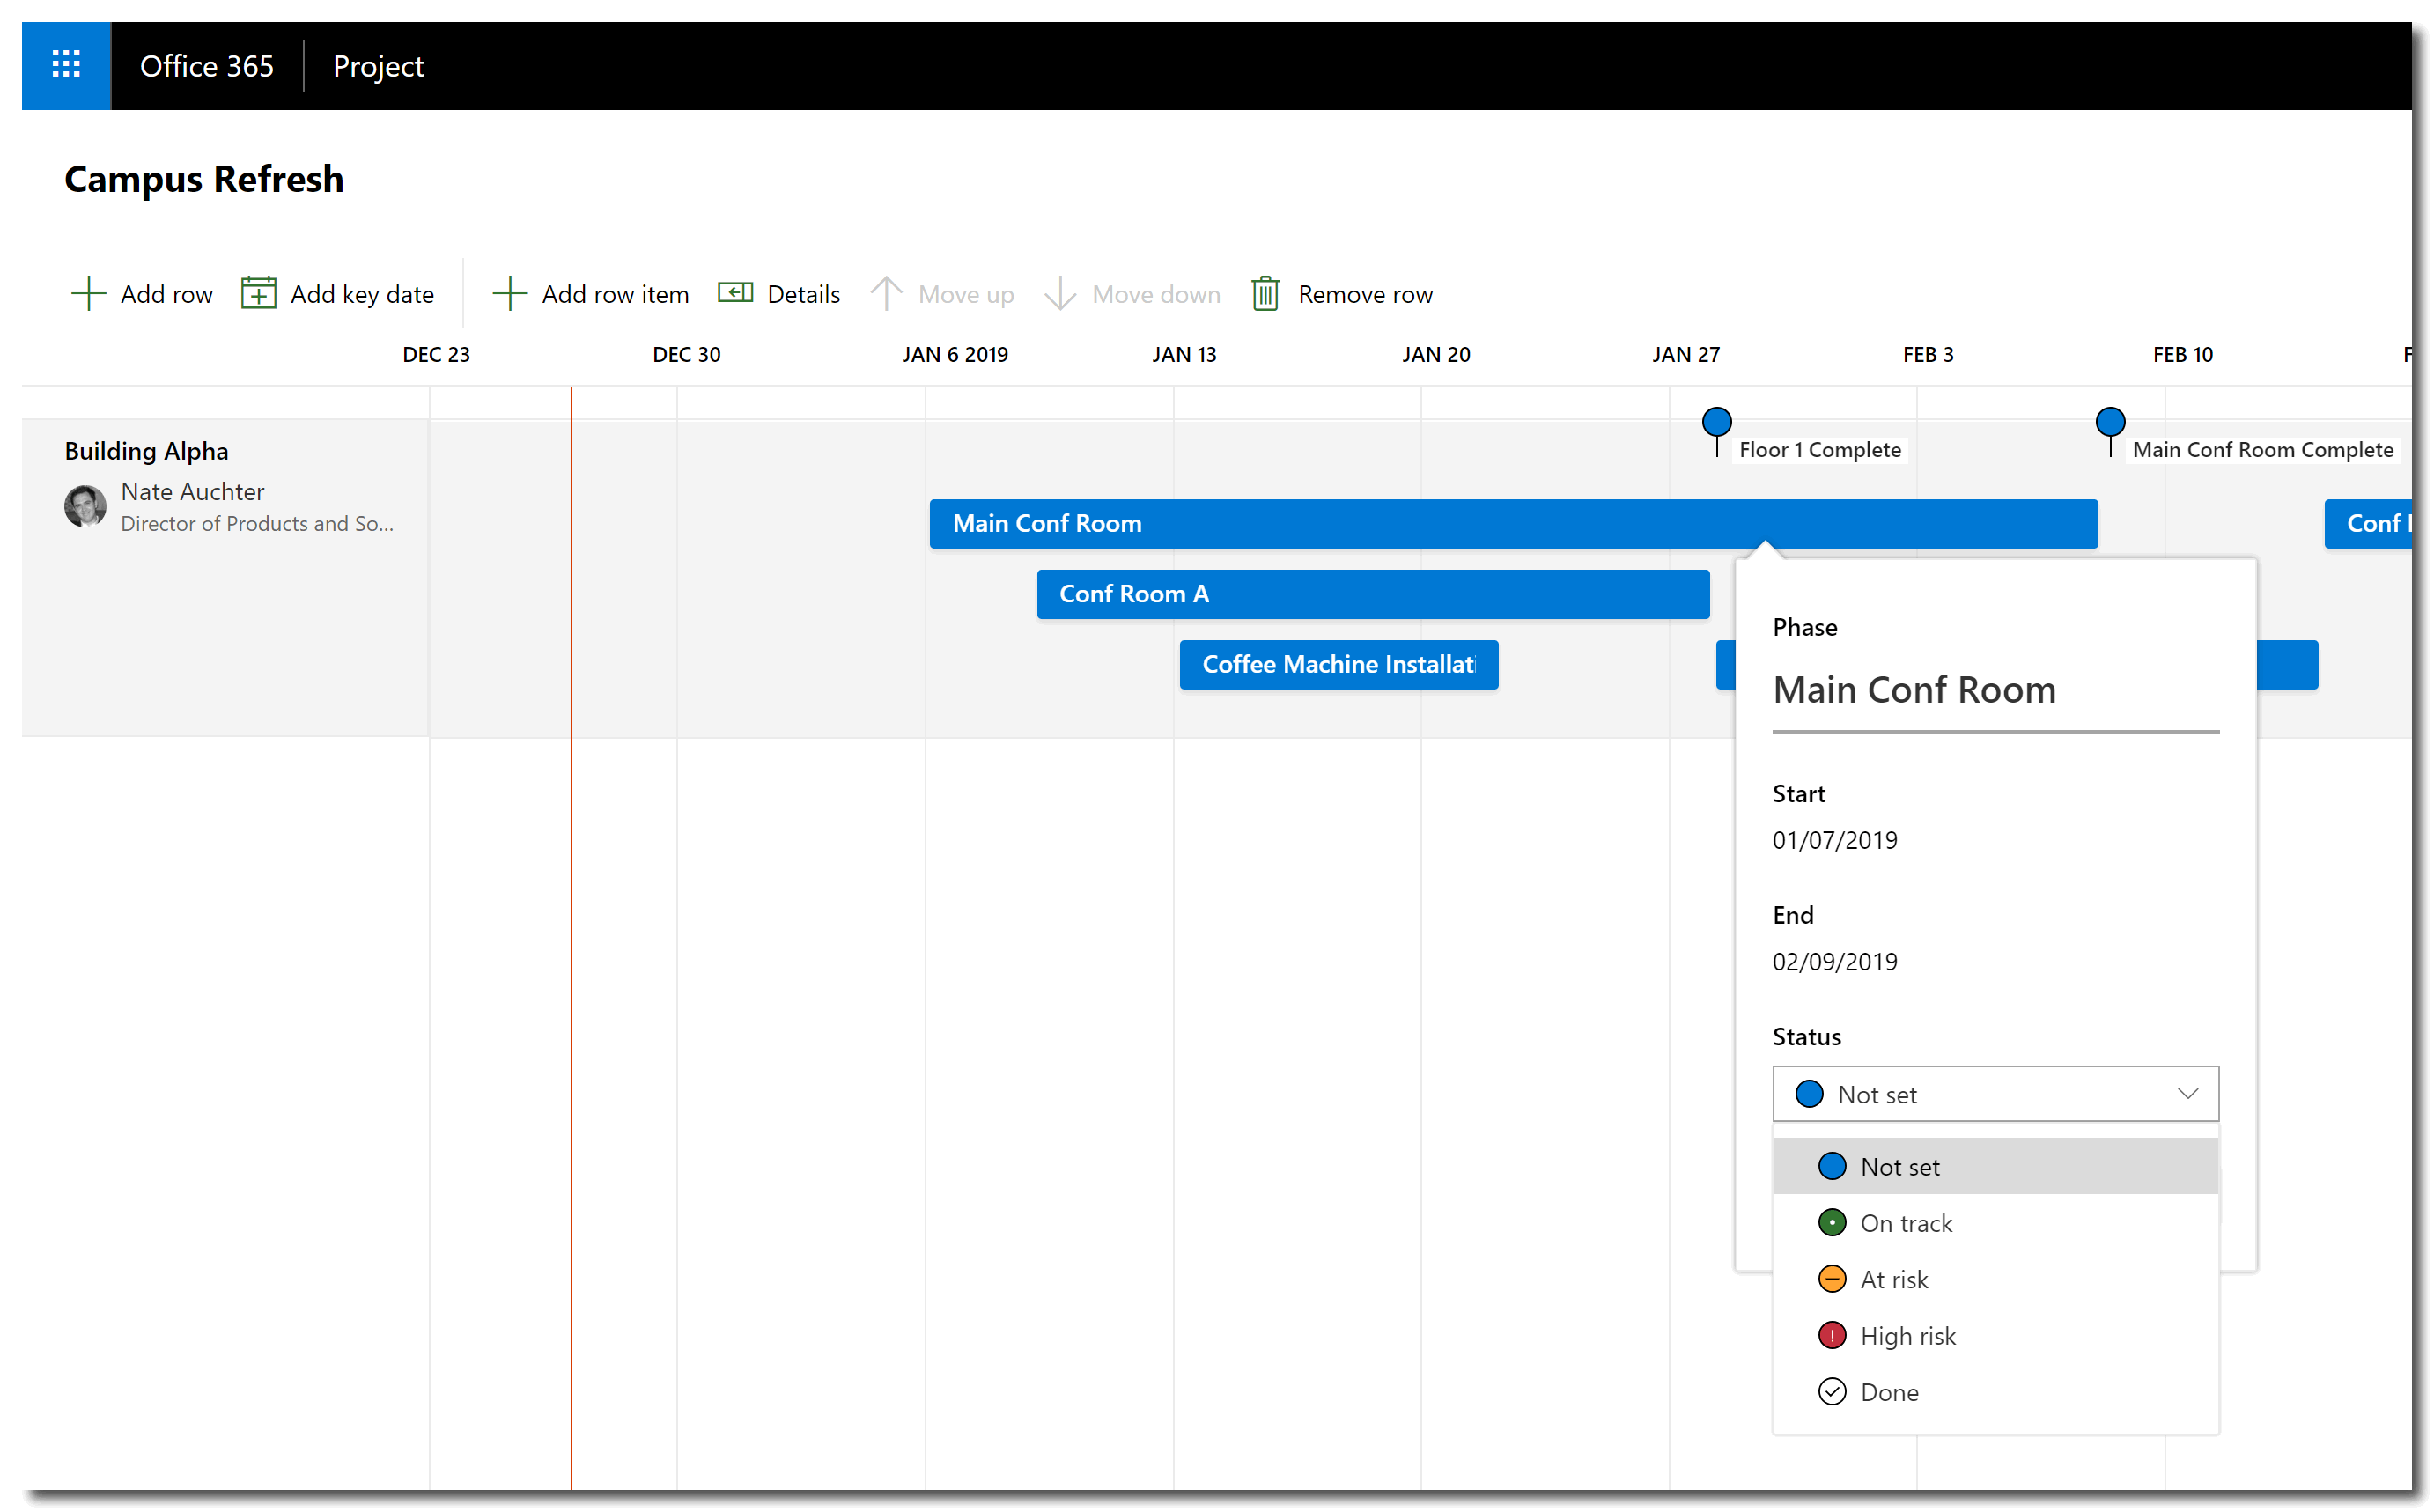
A great feature is the ability for the user to set the status of a given task. When clicking on a task, the roadmap owner can choose one of the available options to define the current status of the task:
 |
|
Figure 10 – Setting the task status |
It is important to mention that the roadmap task status is not tied to the task status in the project schedule – in other words, the status can be maintained manually to keep the stakeholders informed of status trends.
Adding new rows
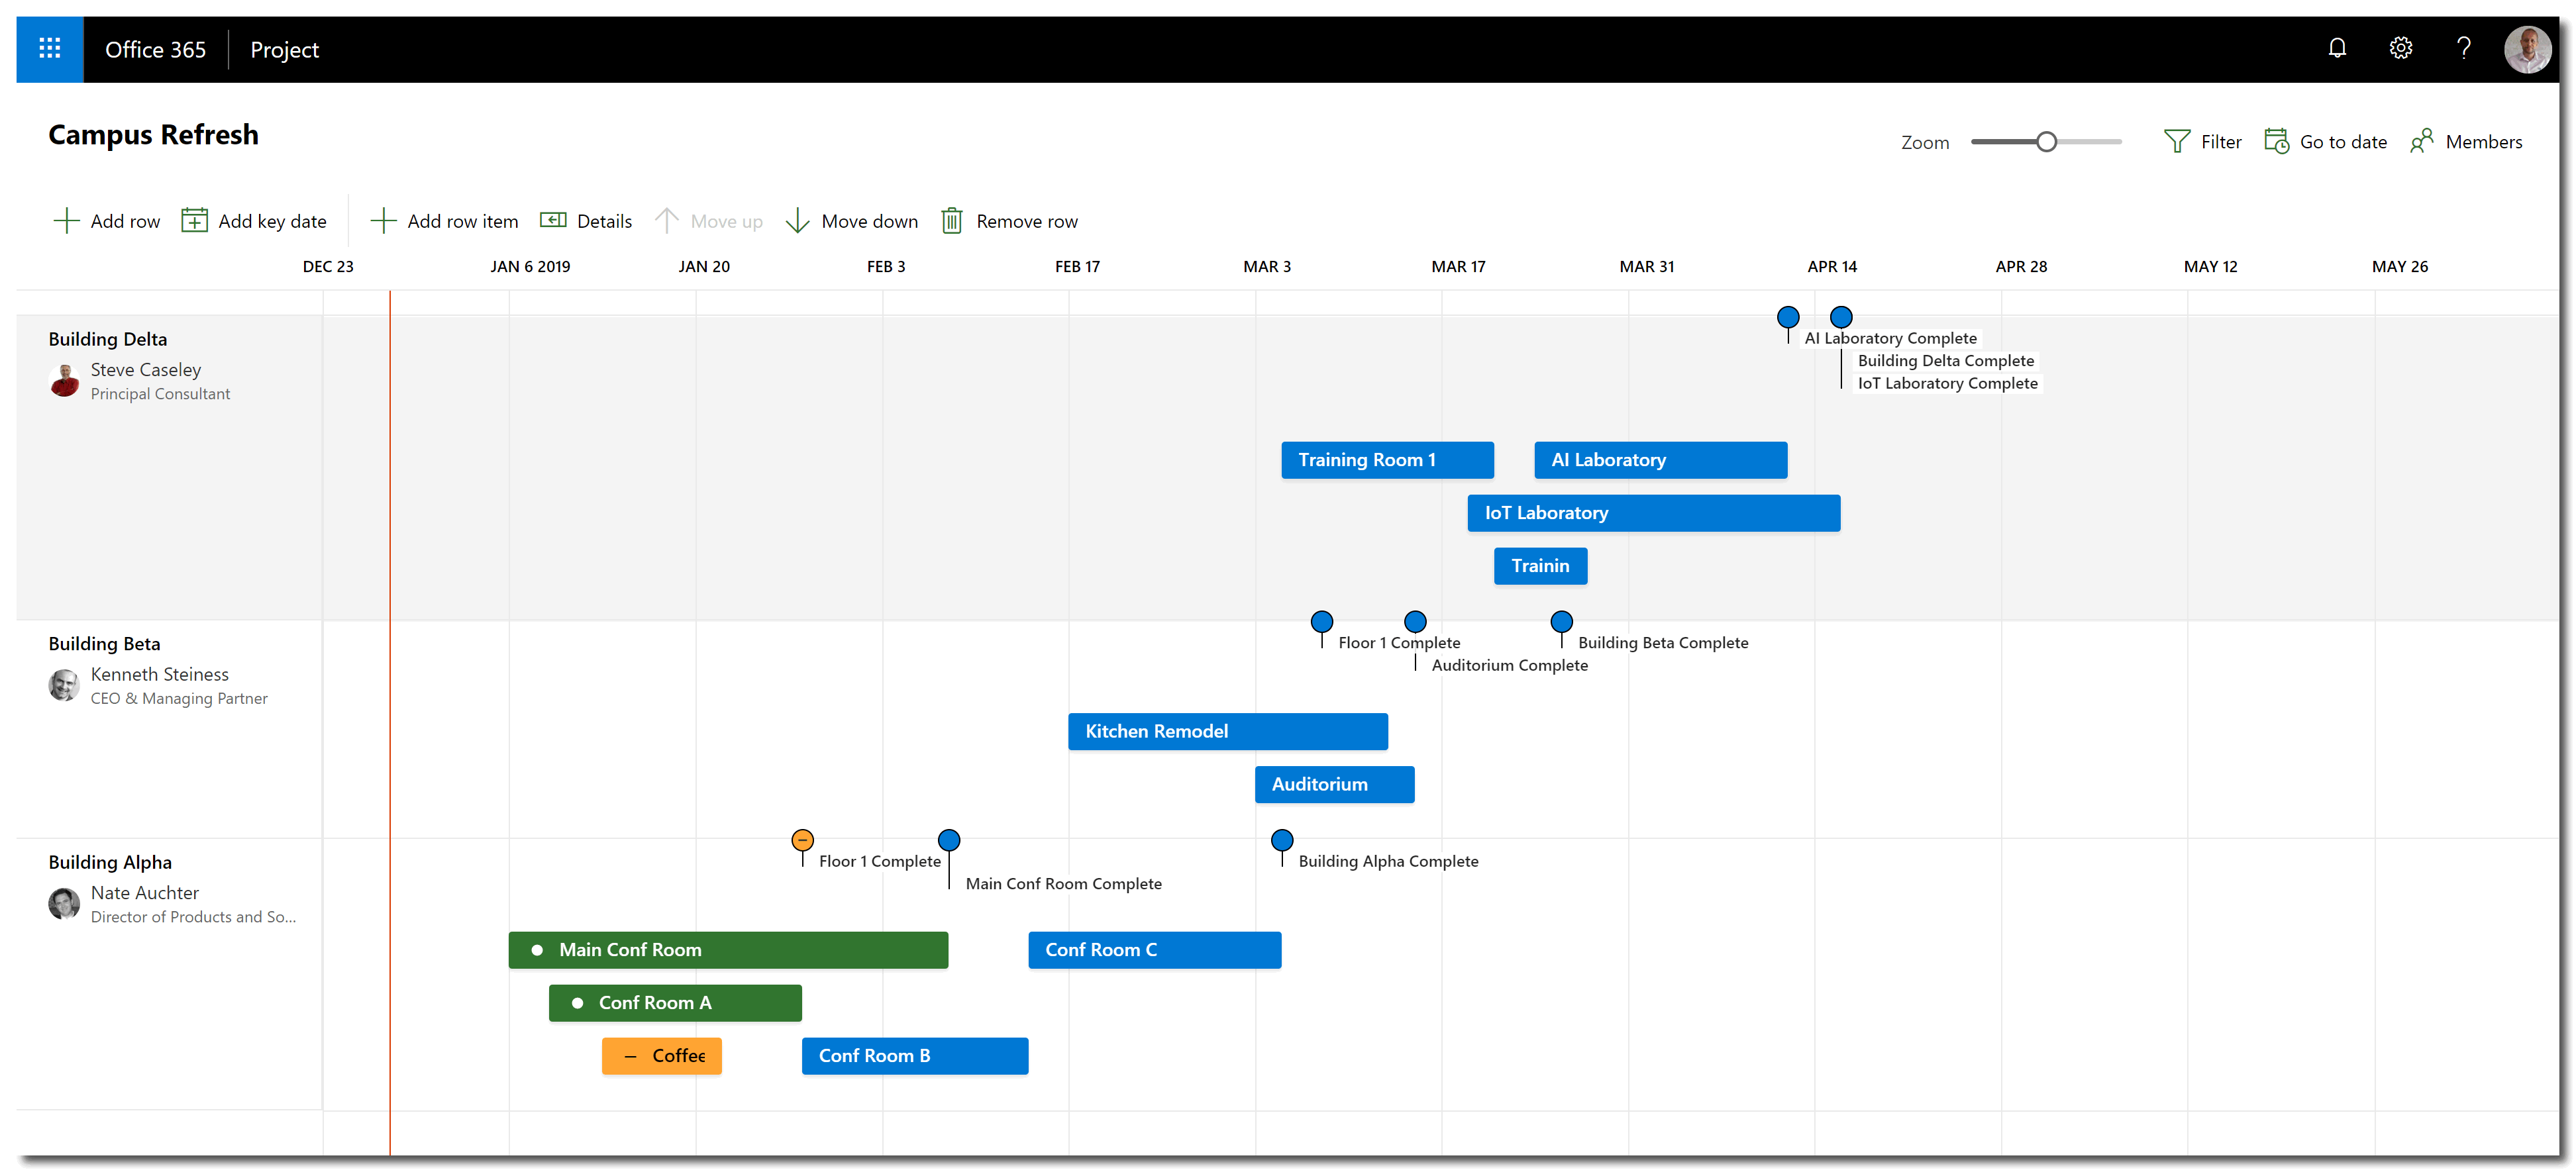
Because a roadmap is intended to represent a program, portfolio or departmental view, you can create new rows to add more projects to your roadmap. Each new row can represent a collection of important tasks from a different project that is also of interest to the stakeholders. To add a new row you can simply follow the steps described above – so in this exercise I will add two new rows with tasks from a project called ‘Building Beta’ and also from a project called ‘Building Delta’, and will also set their status.
Once a new row is added and its items are configured, you can select it and use the Move up or Move down buttons to organize the layout of your roadmap.
 |
|
Figure 11 – New rows added to the roadmap |
 |
|
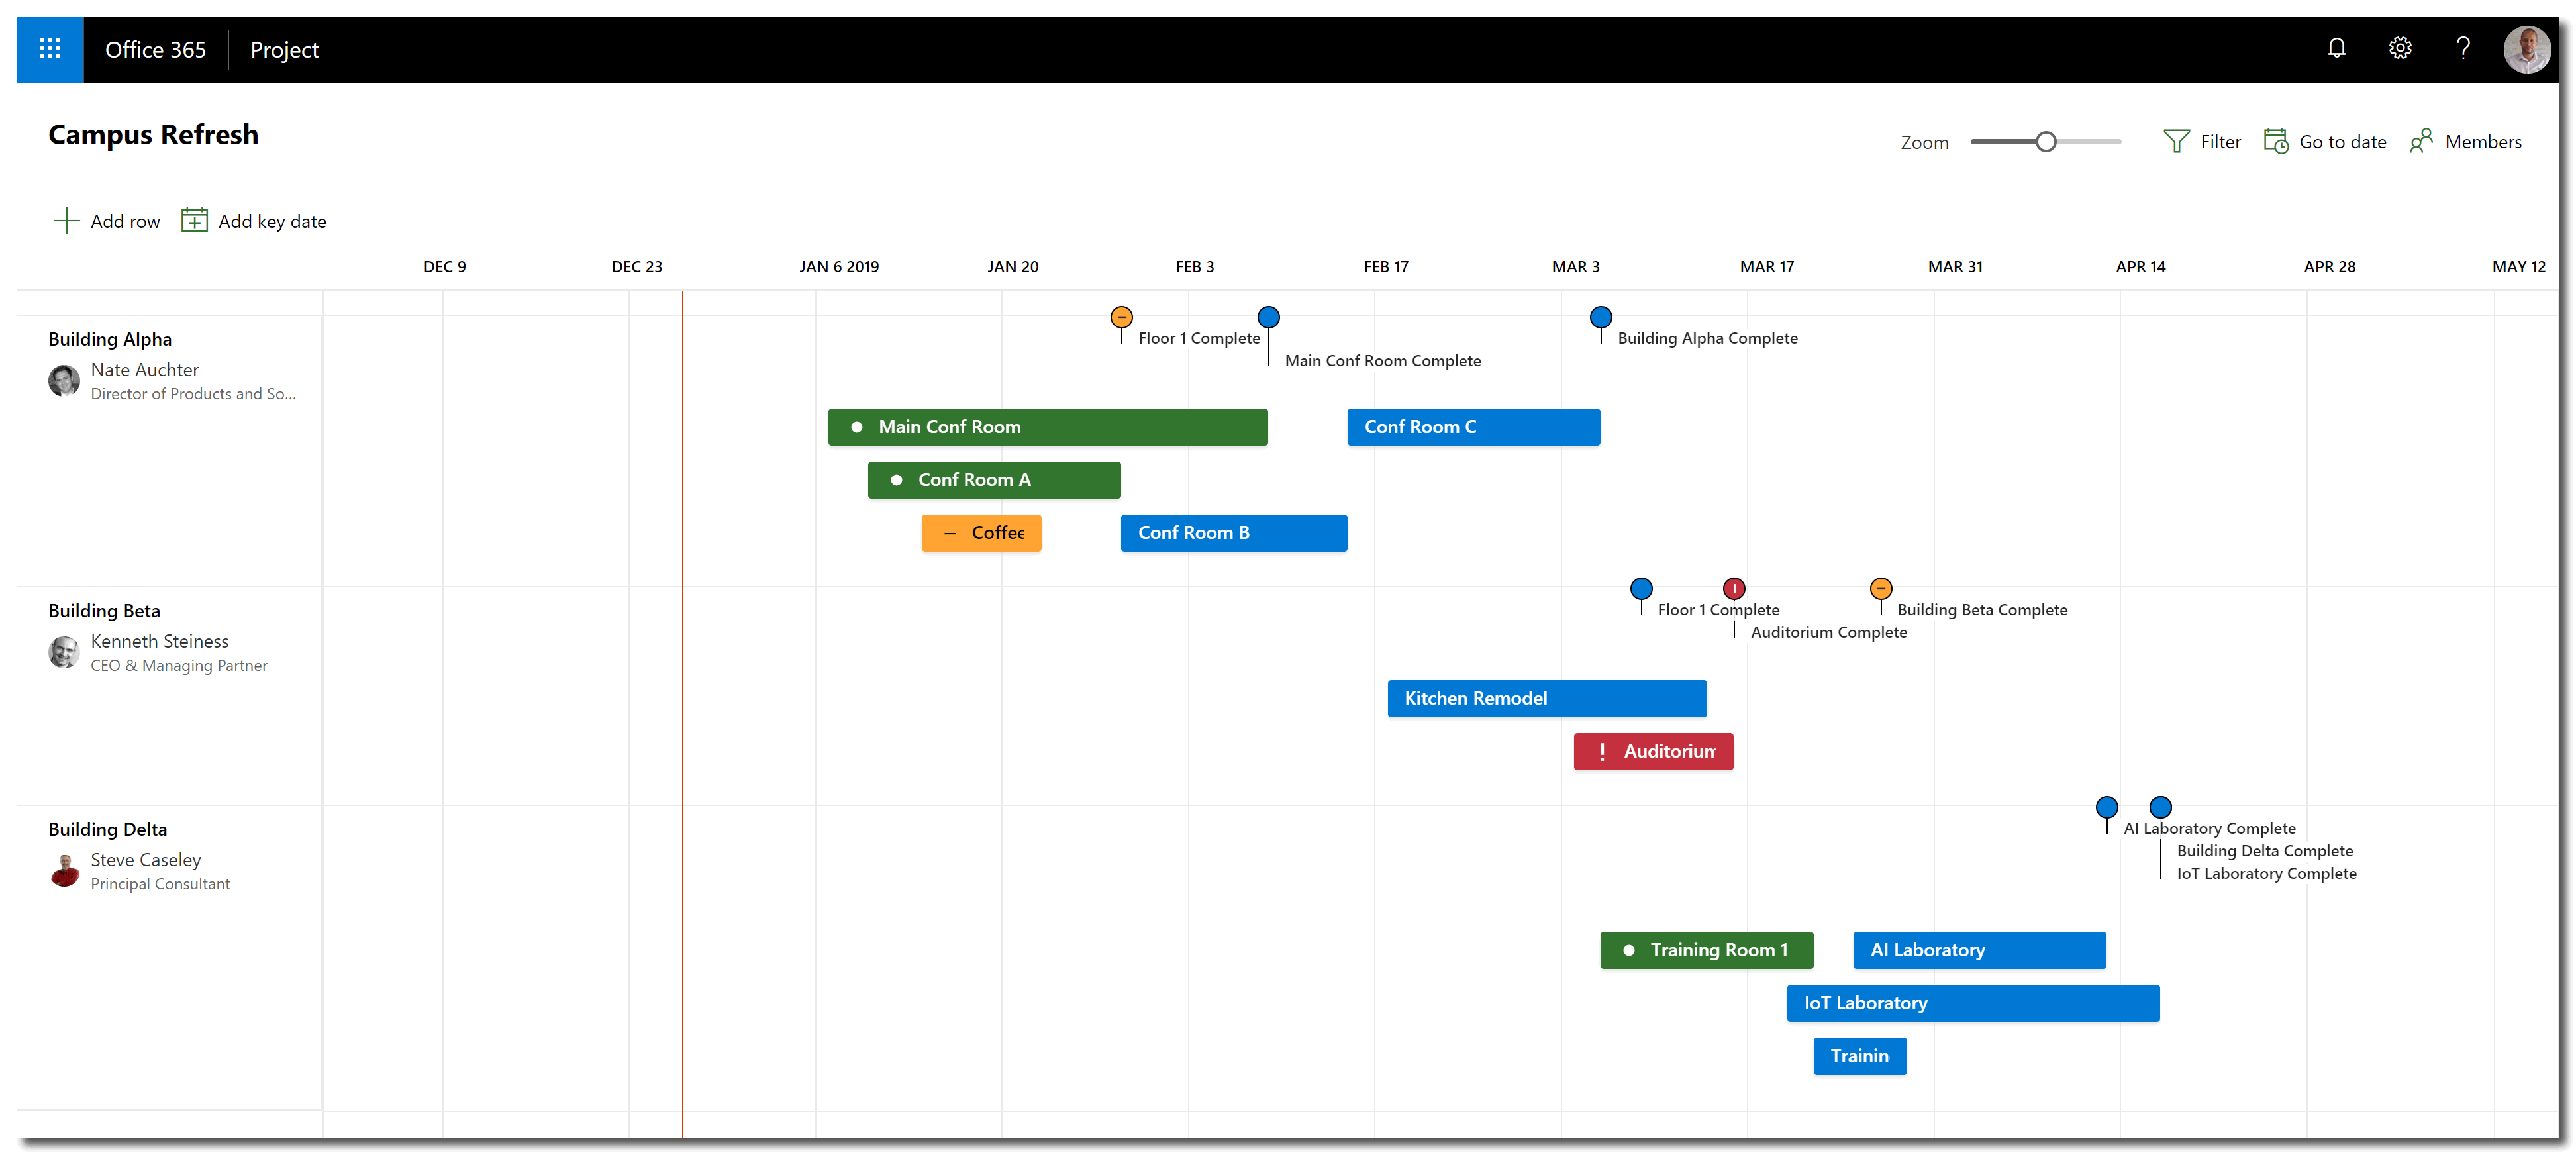
Figure 12 – New rows configured on the roadmap |
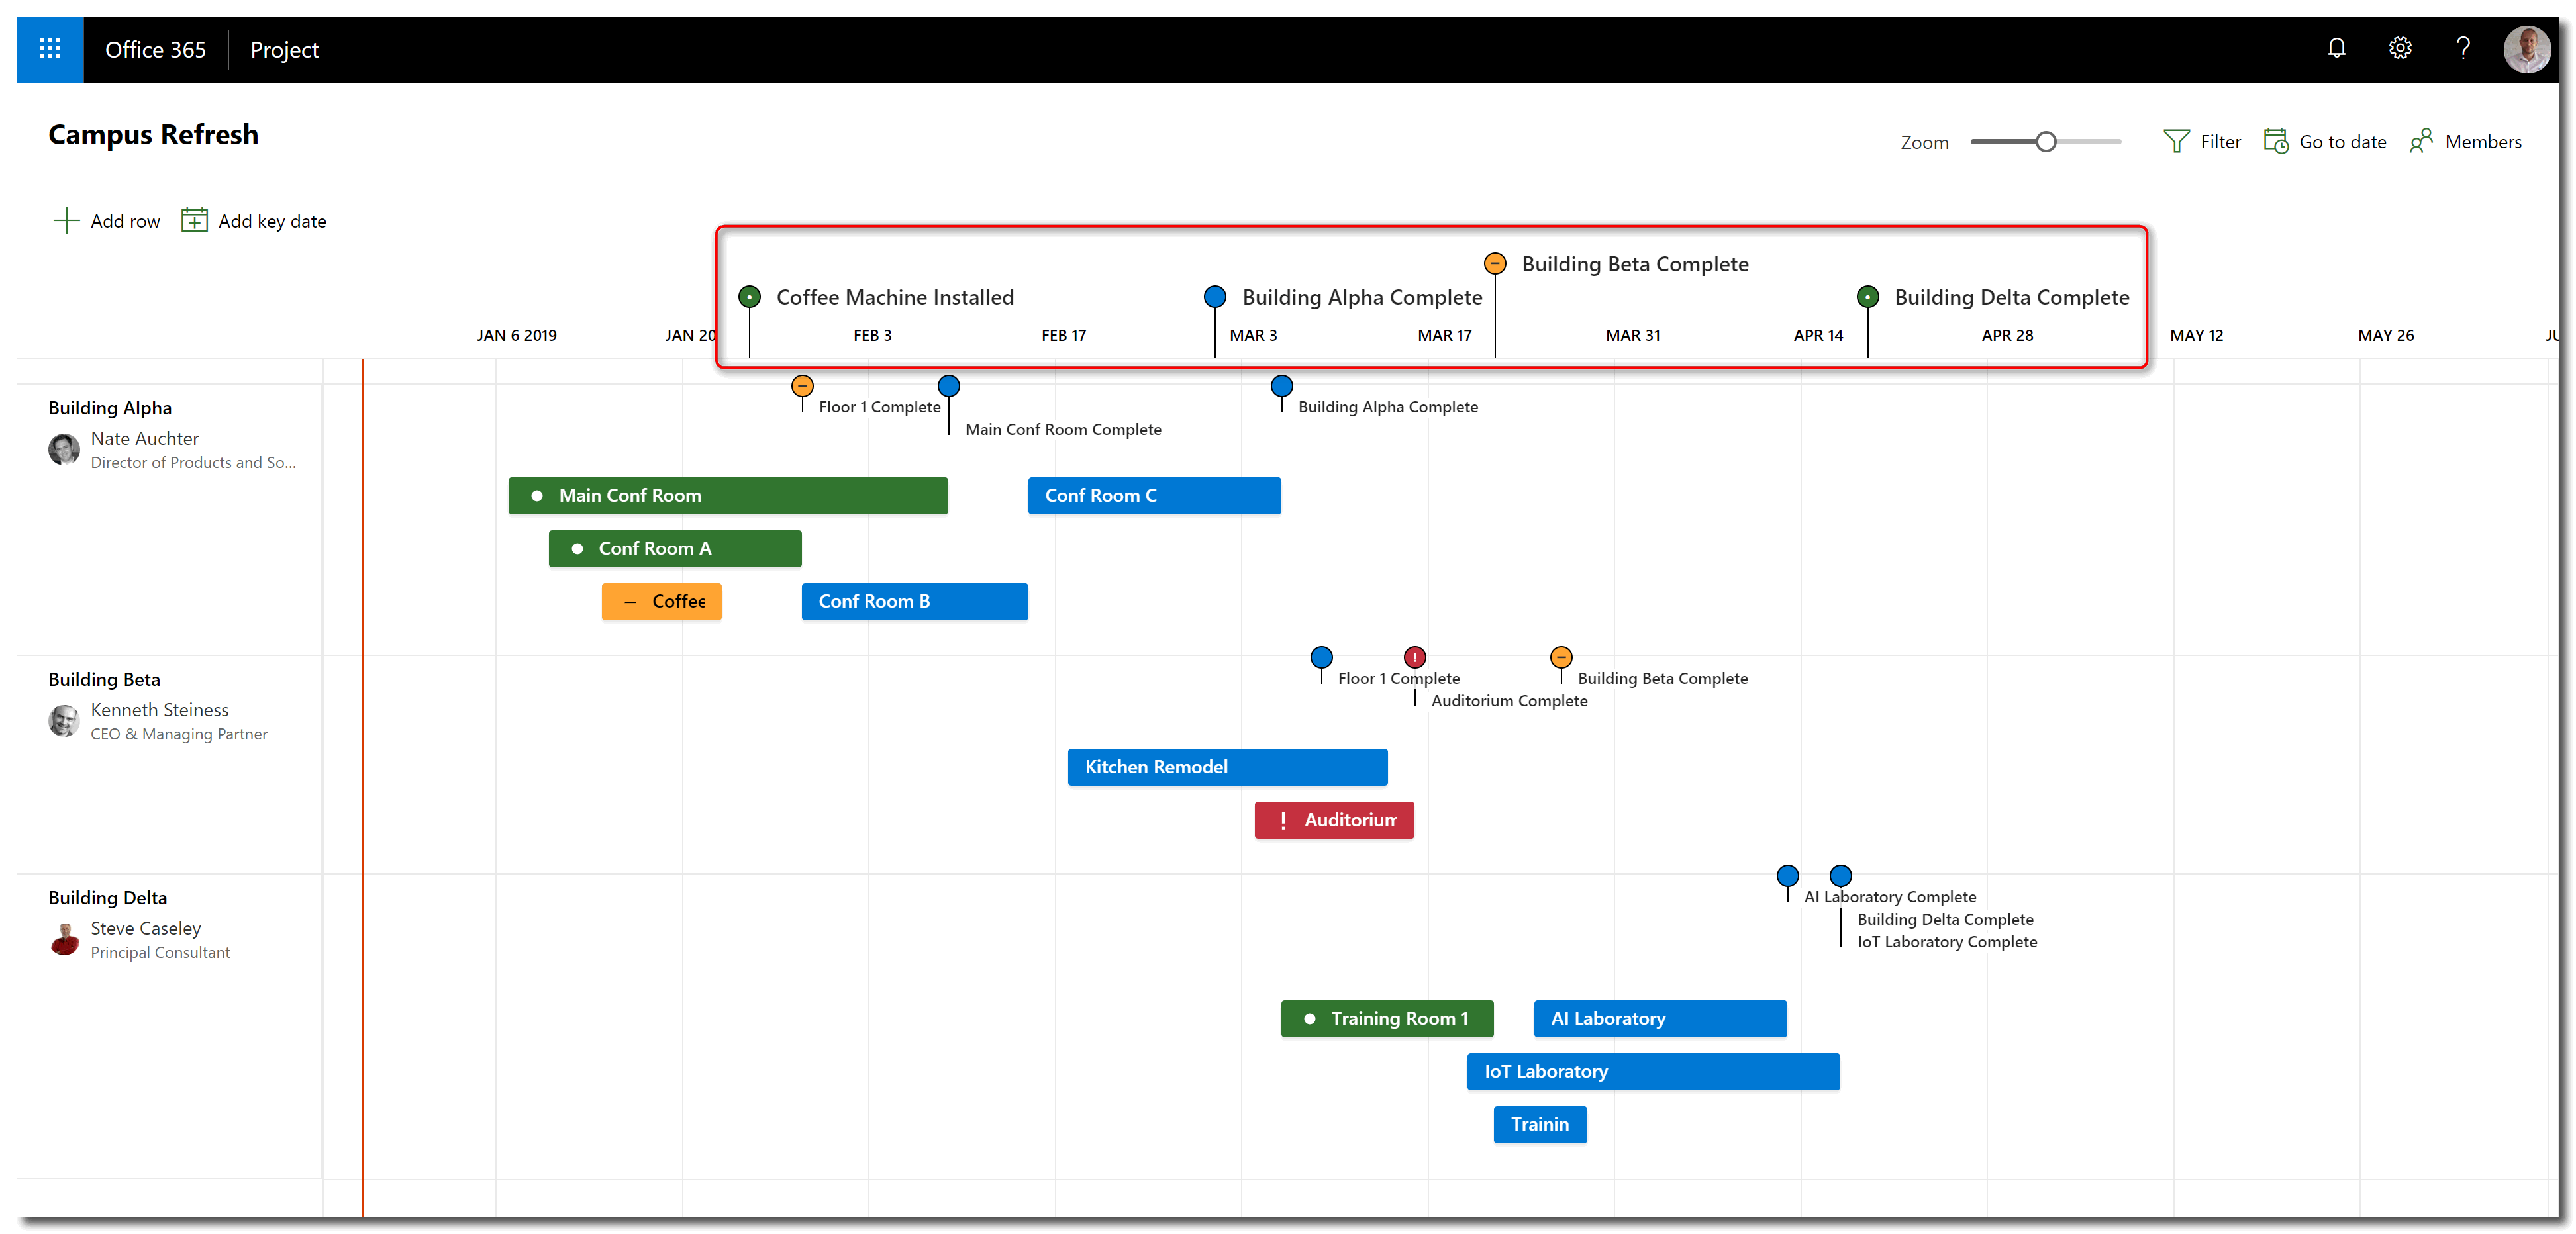
In addition to including items from a project schedule, you also can add Key dates to the roadmap. Think of key dates as organizational milestones that should be watched for the entire roadmap (in our case, for the entire program), and might not be linked to what we are getting from the back-end systems. Stakeholders can then easily compare the milestones from connected projects to the Key dates that have been added at the roadmap/program level.
You can add key dates to your roadmap by clicking the Add key date button and providing the Name, Due Date, and Status.
 |
|
Figure 13 – Adding Key dates to the roadmap |
Once added, Key dates will be displayed at the top of the roadmap, in the Timeline area:
 |
|
Figure 14 – Key dates added to the roadmap |
You can adjust the display to help you focus on what is relevant based on a specific information requirement:
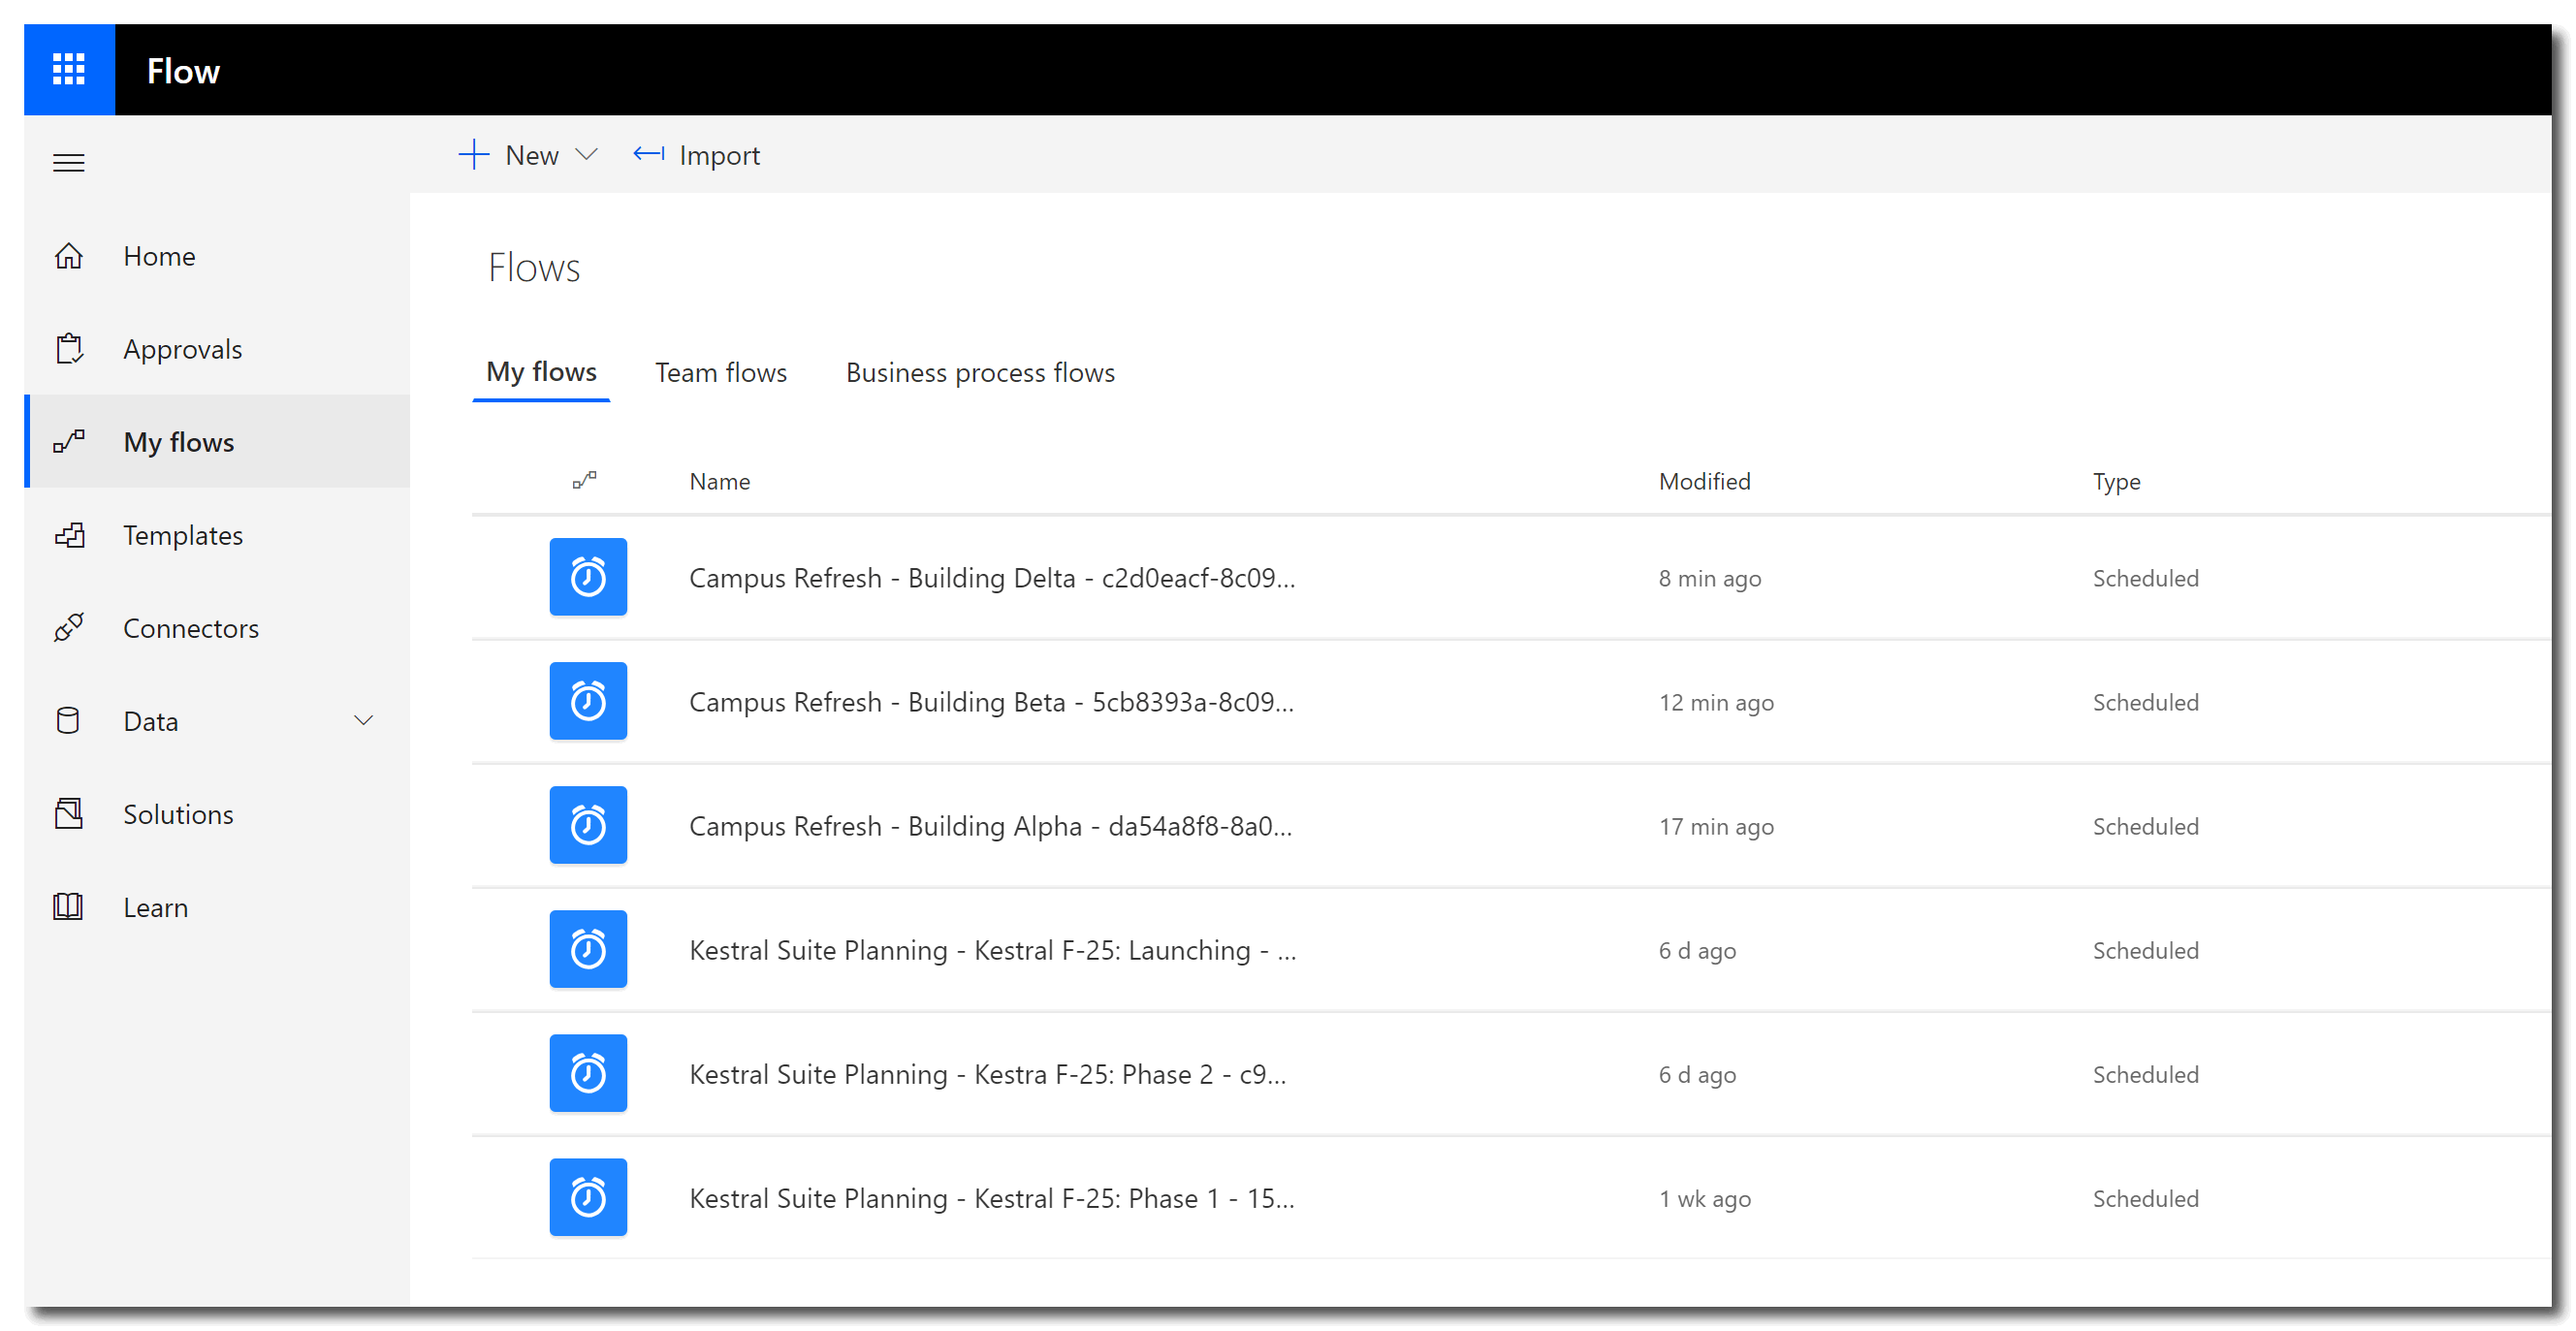
Roadmap (as well as the other tools that are part of ‘Modern Project and Work Management’) is built on top of Common Data Service for Apps, which means they can be fully integrated with other platforms in the ‘Power’ ecosystem, which includes (but is not limited to) Power Apps, Power BI, Flow, Dynamics, and Office 365.
Based on this, after creating a new roadmap and adding rows and items to it, you can navigate to the My flows page and see all flows that have been created using Roadmap. You do this by navigating to Microsoft’s Flow website (http://flow.microsoft.com/) and signing in using your credentials.
 |
|
Figure 15 – Flows created by Roadmap |
At Sensei, we’re excited about the new Roadmap service, especially since it is part of the existing Project Online Professional and Premium subscriptions and available at no additional cost.
We are now building roadmaps for our internal strategic product and training development efforts and also for key go-live dates on customer-facing projects.
There are many possible uses of Roadmap, and they all help to improve communication and create visibility into the organization and what’s important to executives.
Please share with us your stories about how you will use roadmaps within your organization. Send an email with your stories to info@senseiprojectsolutions.com.